
Oracle Hospitality
OPERA Property
Management
Workstation Setup Guide
Release 5.6.X
F18436-06
May 2024
Oracle Hospitality OPERA Property Management Workstation Setup Guide Release 5.6.X
F18436-06
Copyright © 1987, 2024, Oracle and/or its affiliates. All rights reserved.
This software and related documentation are provided under a license agreement containing restrictions on use
and disclosure and are protected by intellectual property laws. Except as expressly permitted in your license
agreement or allowed by law, you may not use, copy, reproduce, translate, broadcast, modify, license, transmit,
distribute, exhibit, perform, publish, or display any part, in any form, or by any means. Reverse engineering,
disassembly, or decompilation of this software, unless required by law for interoperability, is prohibited.
The information contained herein is subject to change without notice and is not warranted to be error-free. If you
find any errors, please report them to us in writing.
If this software or related documentation is delivered to the U.S. Government or anyone licensing it on behalf of
the U.S. Government, then the following notice is applicable:
U.S. GOVERNMENT END USERS: Oracle programs, including any operating system, integrated software, any
programs installed on the hardware, and/or documentation, delivered to U.S. Government end users are
"commercial computer software" pursuant to the applicable Federal Acquisition Regulation and agency-specific
supplemental regulations. As such, use, duplication, disclosure, modification, and adaptation of the programs,
including any operating system, integrated software, any programs installed on the hardware, and/or
documentation, shall be subject to license terms and license restrictions applicable to the programs. No other
rights are granted to the U.S. Government.
This software or hardware is developed for general use in a variety of information management applications. It
is not developed or intended for use in any inherently dangerous applications, including applications that may
create a risk of personal injury. If you use this software or hardware in dangerous applications, then you shall be
responsible to take all appropriate fail-safe, backup, redundancy, and other measures to ensure its safe use.
Oracle Corporation and its affiliates disclaim any liability for any damages caused by use of this software or
hardware in dangerous applications.
Oracle and Java are registered trademarks of Oracle and/or its affiliates. Other names may be trademarks of
their respective owners.
Intel and Intel Xeon are trademarks or registered trademarks of Intel Corporation. All SPARC trademarks are
used under license and are trademarks or registered trademarks of SPARC International, Inc. AMD, Opteron,
the AMD logo, and the AMD Opteron logo are trademarks or registered trademarks of Advanced Micro Devices.
UNIX is a registered trademark of The Open Group.
This software or hardware and documentation may provide access to or information about content, products,
and services from third parties. Oracle Corporation and its affiliates are not responsible for and expressly
disclaim all warranties of any kind with respect to third-party content, products, and services unless otherwise
set forth in an applicable agreement between you and Oracle. Oracle Corporation and its affiliates will not be
responsible for any loss, costs, or damages incurred due to your access to or use of third-party content,
products, or services, except as set forth in an applicable agreement between you and Oracle.

iii
Contents
Contents 3
Preface 4
1 Workstation Operating System Requirement 1-1
2 Workstation Setup Utility 2-1
3 Installing the Java Runtime Client 3-1
Clearing the Java Runtime Client Cache 3-4
4 Setting Microsoft Edge with IE 11 Compatibility Manually 4-1
Prerequisites 4-1
Microsoft Edge Chromium 4-3
Microsoft Edge Administrative template 4-5
Enterprise Mode Site List Manager 4-9
Configurations 4-12
Popup Blocker setting for Reports Preview 4-20
5 Setting Adobe Acrobat Reader Preferences 5-1
6 Installing Client Side Applications 6-1
Installing Oracle Business Intelligence Publisher 6-1
7 Un-Installing Client Side Applications (Optional) 7-1
Un-Installing OPERA JinitCheck Control 7-1
Un-Installing OPERA Register Terminal 7-3
Un-Installing Oracle JInitiator XXXX 7-4

iv
Preface
Purpose
This document describes how to setup a workstation for Oracle Hospitality OPERA
Property Management Version 5.6 and higher.
Audience
This document is intended for all Oracle Hospitality OPERA 5 users.
Customer Support
To contact Oracle Customer Support, access the Customer Support Portal at the
following URL:
https://iccp.custhelp.com
When contacting Customer Support, please provide the following:
• Product version and program/module name
• Functional and technical description of the problem (include business impact)
• Detailed step-by-step instructions to re-create
• Exact error message received
• Screen shots of each step you take
Documentation
Oracle Hospitality product documentation is available on the Oracle Help Center at
http://docs.oracle.com/en/industries/hospitality/
Table 1-1 Revision History
Date
Description
June 2016
• Initial Publication
July 2016
• Minor updates
July 2018
• Updates to reflect current version
information
April 2019
• Updates to reflect 5.6.5
April 2022
• Removed support for 5.5
May 2022
• Updated Compatibility
November 2022
• Revised OS Compatibility

v
Date
Description
May 2024
• Updated the Customer Support section
with the new support portal name and
URL
• Formatted the document and included in
the latest template
• Updated the Workstation Setup Utility
chapter with the reference article

1-1
1
Workstation Operating System
Requirement
To find the operating system requirements for Oracle Hospitality OPERA Property
Management Version 5.6 and higher, refer to the OPERA Property Management Client
and Server Compatibility Matrix document on the Oracle Help Center at
https://docs.oracle.com/cd/E98457_01/index.html

2-1
2
Workstation Setup Utility
The workstation setup utility is designed to simplify the configuration required to run
OPERA 5 on Microsoft Edge with IE11 compatibility mode. See ICCP article (Doc ID:
DOC8489) https://iccp.custhelp.com/app/answers/answer_view/a_id/1008812
If you use the Workstation Setup Utility, skip chapters 3 and 4.

3-1
3
Installing the Java Runtime Client
NOTE:
If upgrading from 5.5.0.x to 5.6.x.x it is necessary to clear your Java cache.
See Clearing the Java Runtime Client Cache for details.
1. To find the required JRE version (for example, JRE 7 or JRE 8), refer to the OPERA
Property Management Client and Server Compatibility Matrix document on the
Oracle Help Center at https://docs.oracle.com/cd/E98457_01/index.html
NOTE:
While the latest update of supported JRE is recommended, the specific versions
of JRE used during the QA of an OPERA patch can be found in the application
release notes.
2. Log on to the workstation with a user account that has local administrator rights.
3. Download the required JRE version from one of these pages:
http://www.oracle.com/technetwork/java/javase/downloads/jre8- downloads-
2133155.html
http://www.oracle.com/technetwork/java/javase/archive-139210.html
4. Next to Windows x86 Offline, click the link jre-xxxx-windows-i586.exe to begin the
download.
NOTE:
Only 32-bit versions of the JRE are supported with OPERA.
5. When asked if you want to run or save from download.oracle.com, click Run.
6. Click the Java icon on the taskbar.
Chapter 3
Installing the Java Runtime Client
3-2
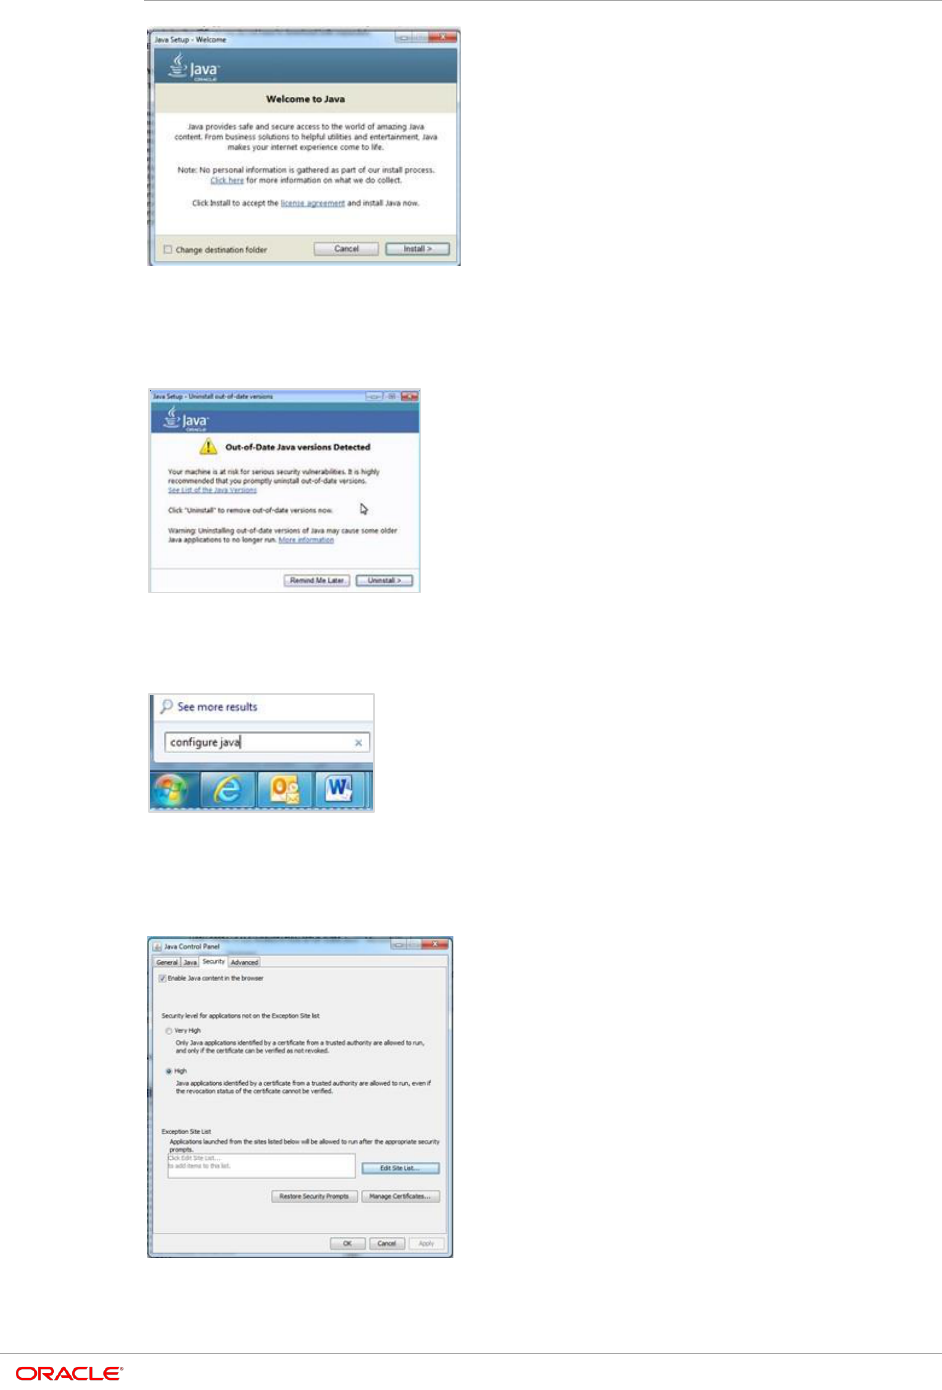
7. On the Java Setup - Welcome screen, click Install.
After the installation has completed, the Java Setup - Uninstall out-of-date
versions screen appears.
8. Click Uninstall.
9. Click Microsoft Windows Start.
10. Click in the Search programs and files field, type configure java and then press
Enter.
11. On the Java Control Panel screen, click the Security tab.
12. Click Edit Site List….
Chapter 3
Installing the Java Runtime Client
3-3
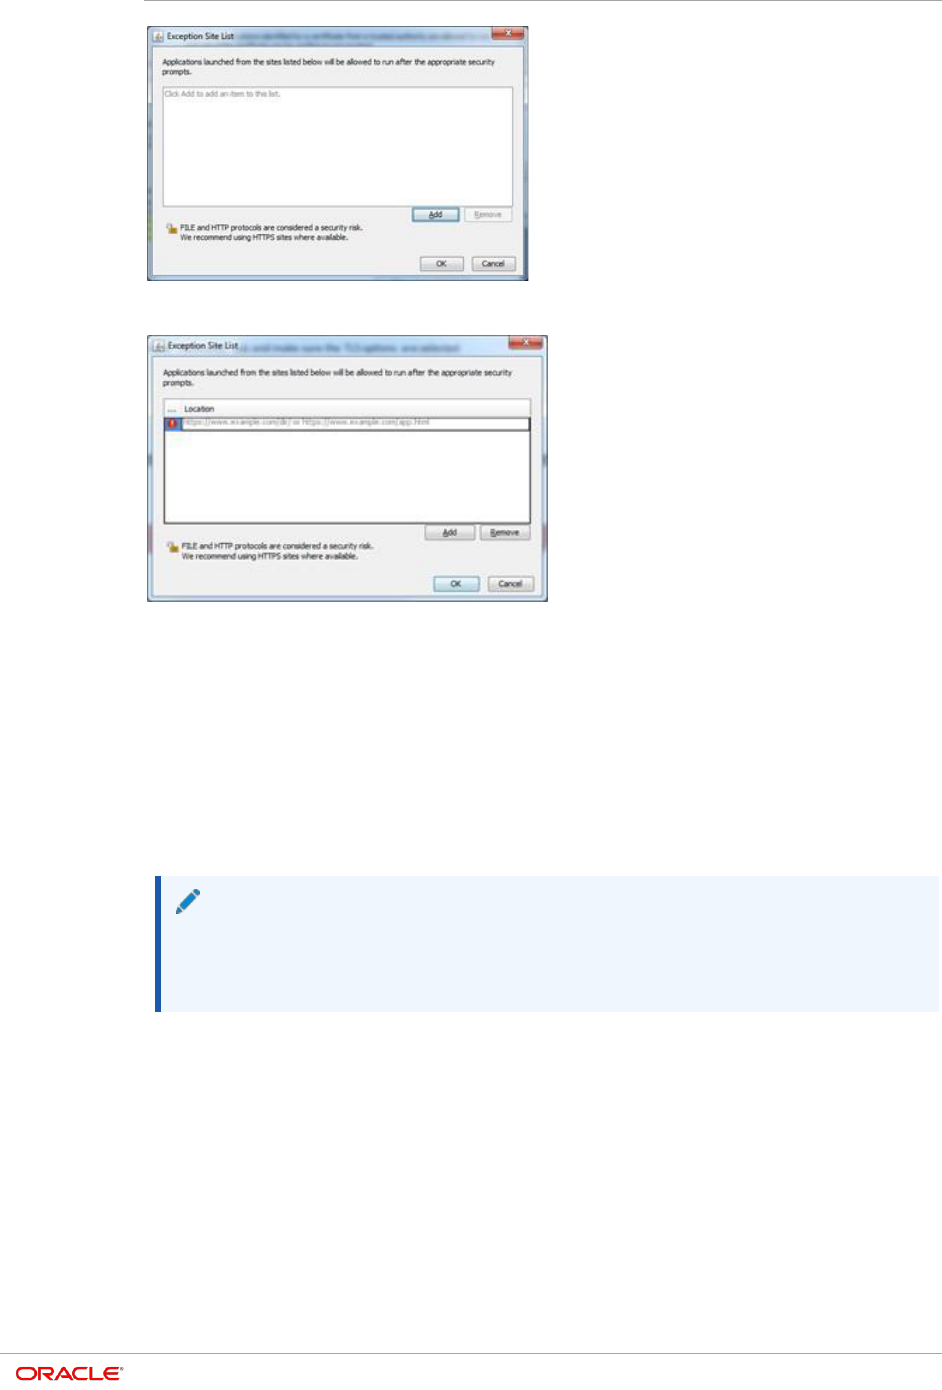
13. On the Exception Site List screen, click Add.
14. Click in the Location field, enter your OPERA application URL with http and then
click Add.
For example, depending on your OPERA application version and hosted location,
your URLs should look something like:
http://<yourOPERAURL>.microsdc.us
Or
http://<yourSSD>-prod-<yourENV>.hospitality.oracleindustry.com
NOTE:
Do not enter a URL that includes ‘OAM’, also do not include any paths beyond
the hostname that ends in .com.
15. Click in the Location field, enter your OPERA application URL with https http and
then click Add.
For example, depending on your OPERA application version and hosted location,
your URLs should look something like:
https://<yourOPERAURL>.microsdc.us
Or
https://<yourSSD>-prod-<yourENV>.hospitality.oracleindustry.com
Chapter 3
Installing the Java Runtime Client
3-4
NOTE:
Do not enter a URL that includes ‘OAM’, also do not include any paths beyond
the hostname that ends in .com.
16. On the Java Control Panel screen, select the Advanced tab.
17. Ensure that the Use TLS 1.2 check box is selected. If not, select it.
NOTE:
Older releases of OPERA 5 may also require SSLv3 or TLS1.0 to function.
18. Click Apply and then click OK.
19. Close Microsoft Internet Explorer, open it again, and log into OPERA.
Clearing the Java Runtime Client Cache
When upgrading from 5.5.0.x to 5.6.x.x it is necessary to clear your Java cache after
installing the new JRE version.
Java Cache Clearing is necessary when there is a larger version gap between the source
version and the upgraded target version because we changed the Java Workstation
Cache a few times since lower versions of 5.5.0.x.
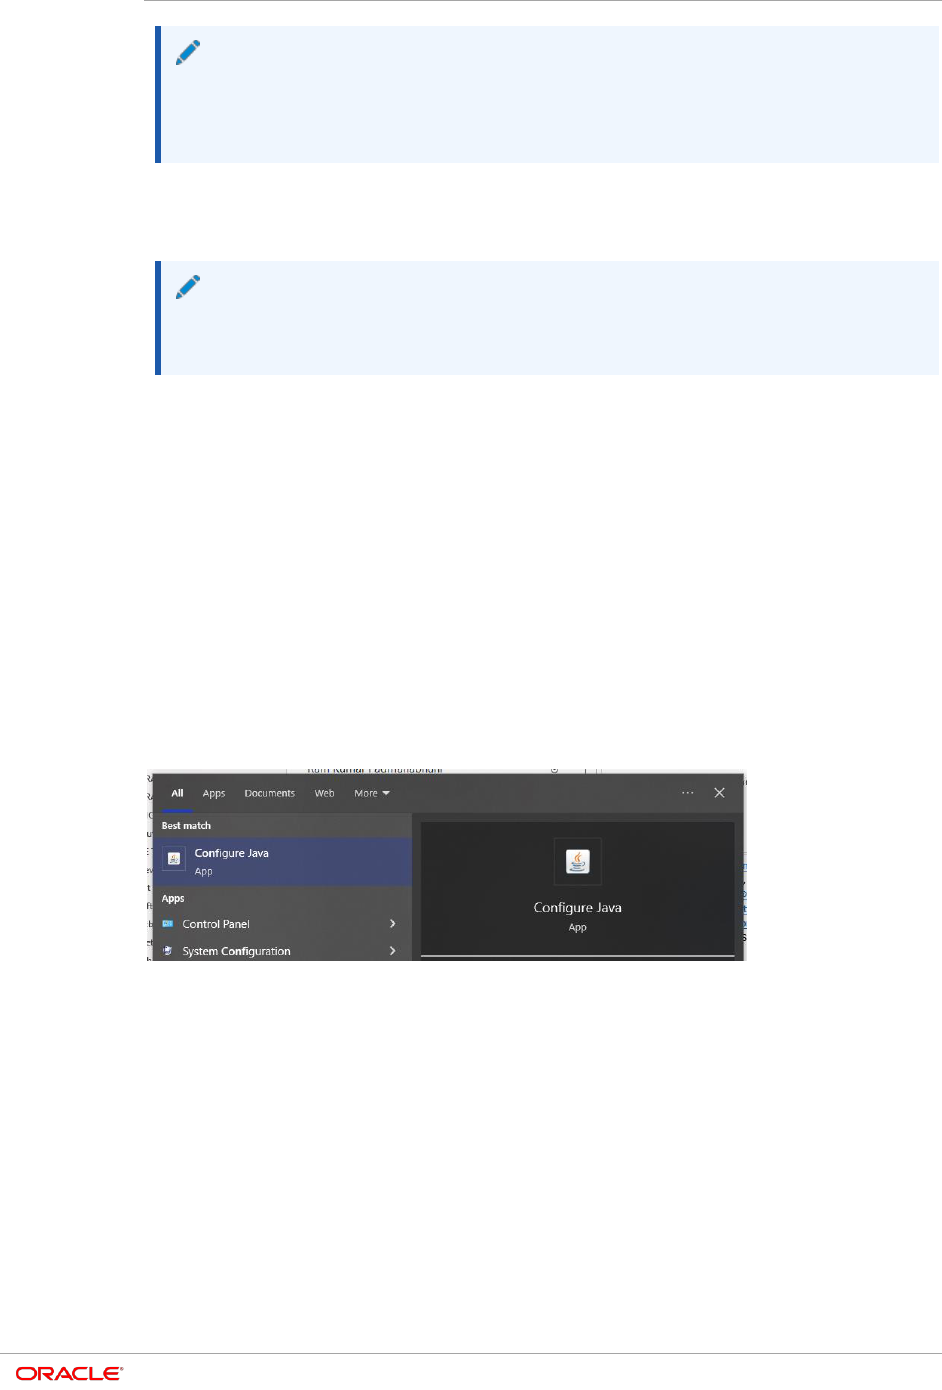
1. Search for and open Configure Java.
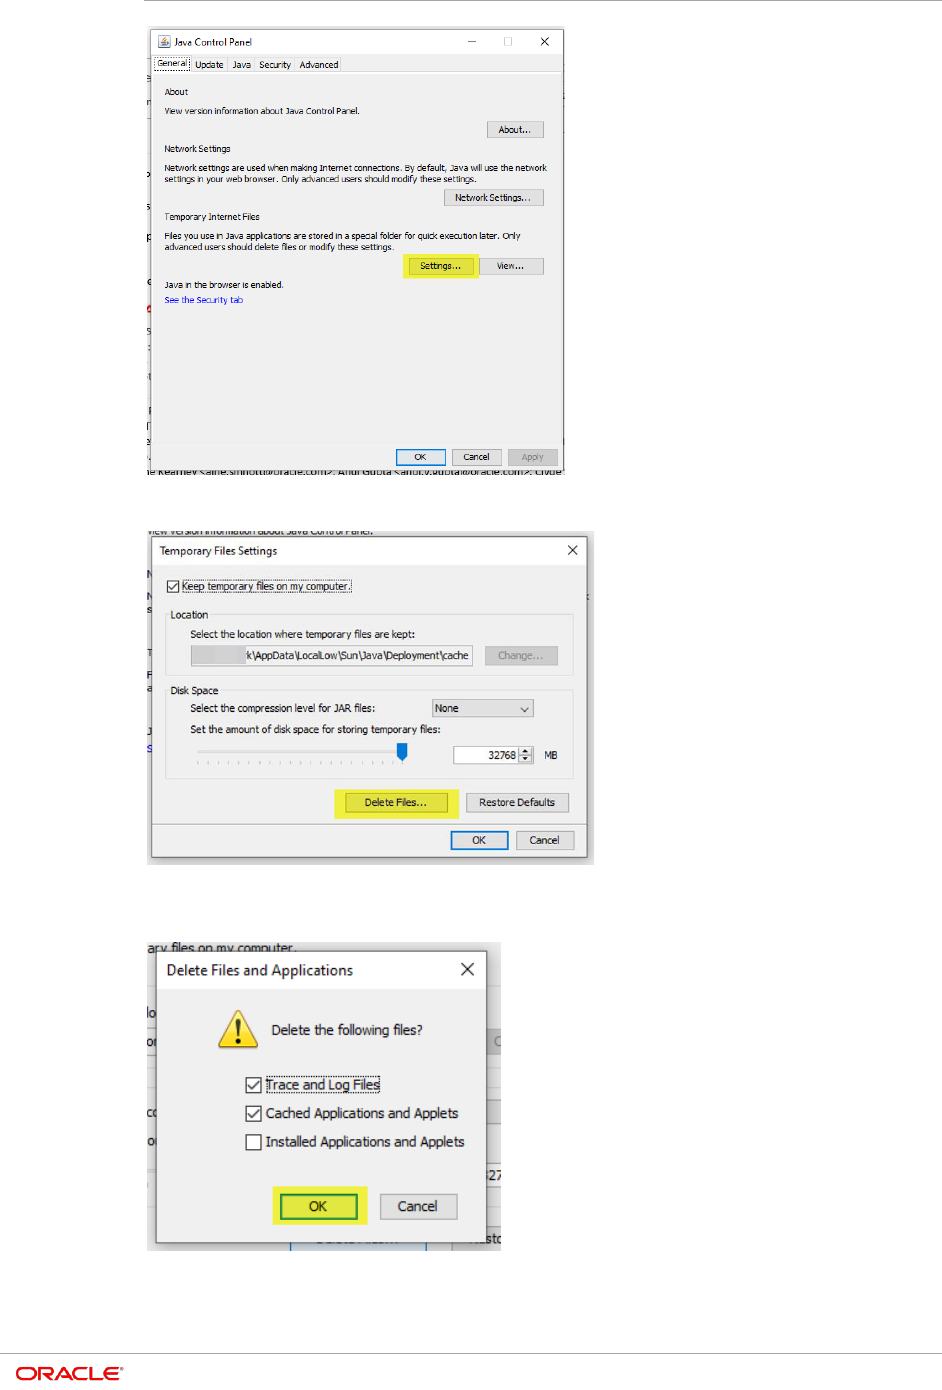
2. Under General tab, click Settings.
Chapter 3
Installing the Java Runtime Client
3-5
3. Click Delete Files.
4. The options 'Trace and Logs Files' and 'Cached Applications and Applets' should
already be selected when you open this screen. Click OK.
4-1
4
Setting Microsoft Edge with IE 11
Compatibility Manually
Oracle Hospitality OPERA 5 is compatible when Microsoft Edge (based on Chromium) is
configured to use Internet Explorer (IE) 11 compatibility mode.
The following section explains the changes required to enable IE 11 Compatibility Mode
in Microsoft Edge (based on Chromium).
NOTE:
OPERA 5 is not compatible with Google Chrome, Mozilla Firefox, and other
browsers.
Prerequisites
The Windows version should match with one of the versions listed here:
https://docs.microsoft.com/en-us/deployedge/edge-ie-mode
How to verify your Microsoft Windows operating
system version
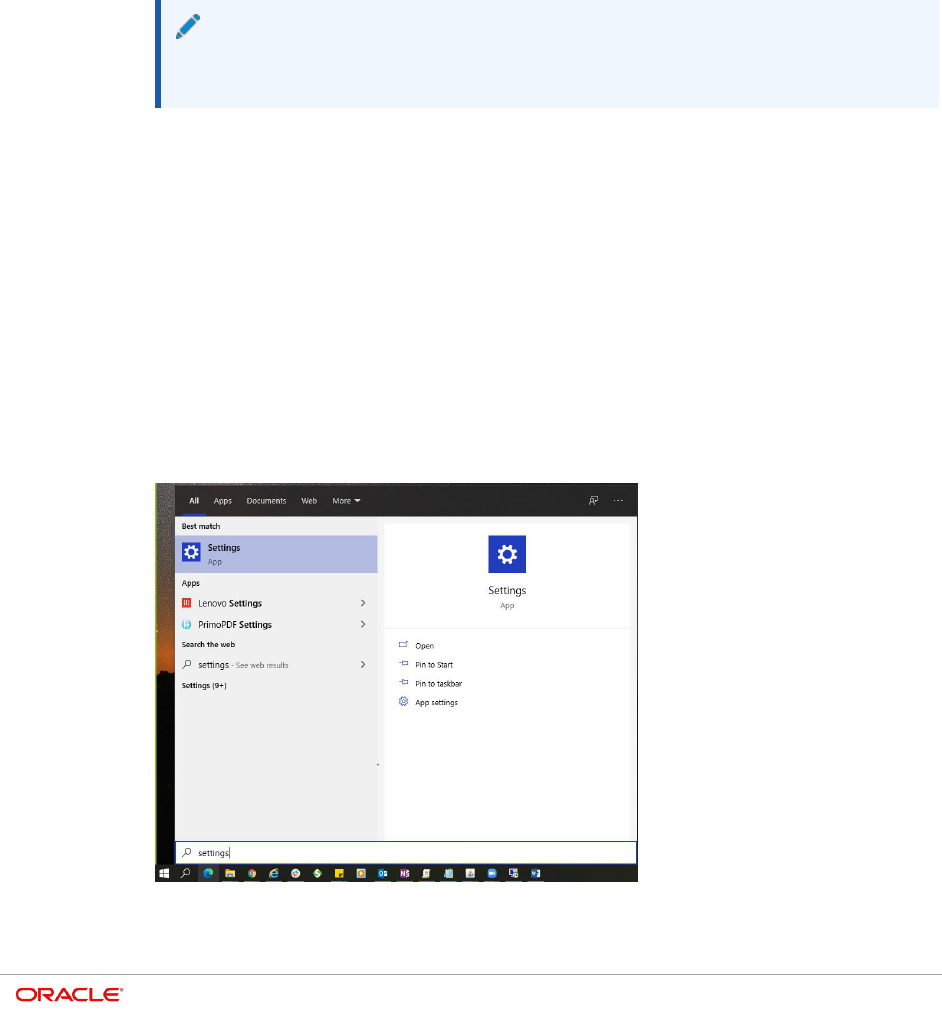
1. Go to Windows, Settings.
2. Click System.

Chapter 4
Setting Microsoft Edge with IE 11 Compatibility Manually
4-2
3. Click About and verify the version under Windows Specifications.
Enable Internet Explorer 11 in Windows Features:
1. Go to Windows, Turn Windows features on or off.
2. On the Windows Features popup screen, ensure that Internet Explorer 11 checkbox
is selected.

Chapter 4
Setting Microsoft Edge with IE 11 Compatibility Manually
4-3
Microsoft Edge Chromium
Download and Install Microsoft Edge Chromium
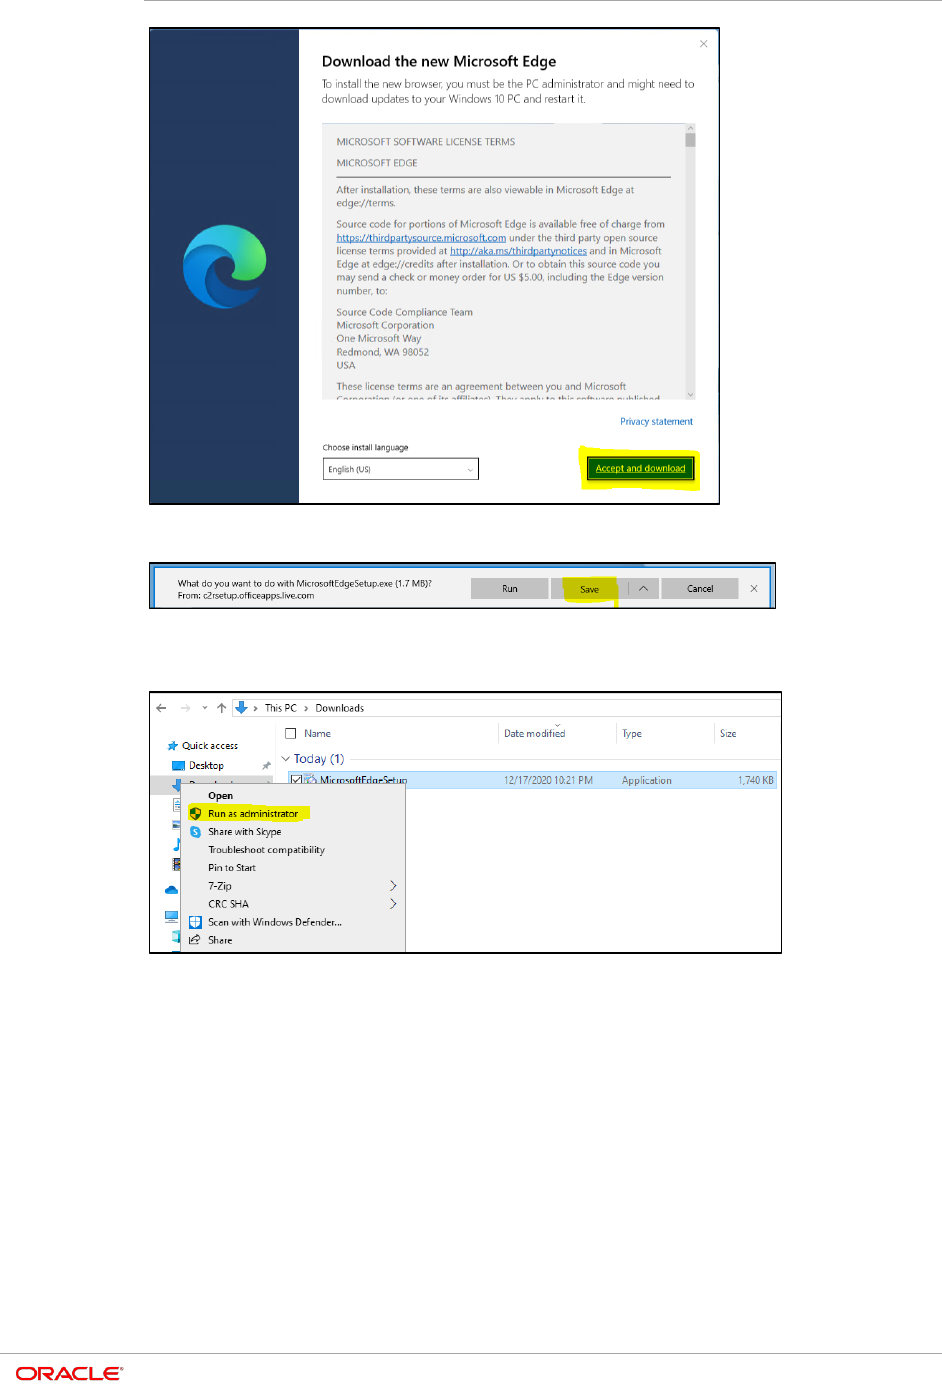
1. Click the following URL to download Microsoft Edge.
https://www.microsoft.com/en-us/edge
2. Click Try Now.
3. Select DOWNLOAD for Windows 10 (Choose based on your machine Operating
System), popup window “Download the new Microsoft Edge” is displayed. Click
Accept and Download.
Chapter 4
Setting Microsoft Edge with IE 11 Compatibility Manually
4-4
4. Save the Setup file.
5. Navigate to the location where the Setup file is downloaded. Select the file, right click,
and then select Run as Administrator. Wait for the setup to complete.
Chapter 4
Setting Microsoft Edge with IE 11 Compatibility Manually
4-5
Microsoft Edge Administrative template
Download and configure the Microsoft Edge Administrative template
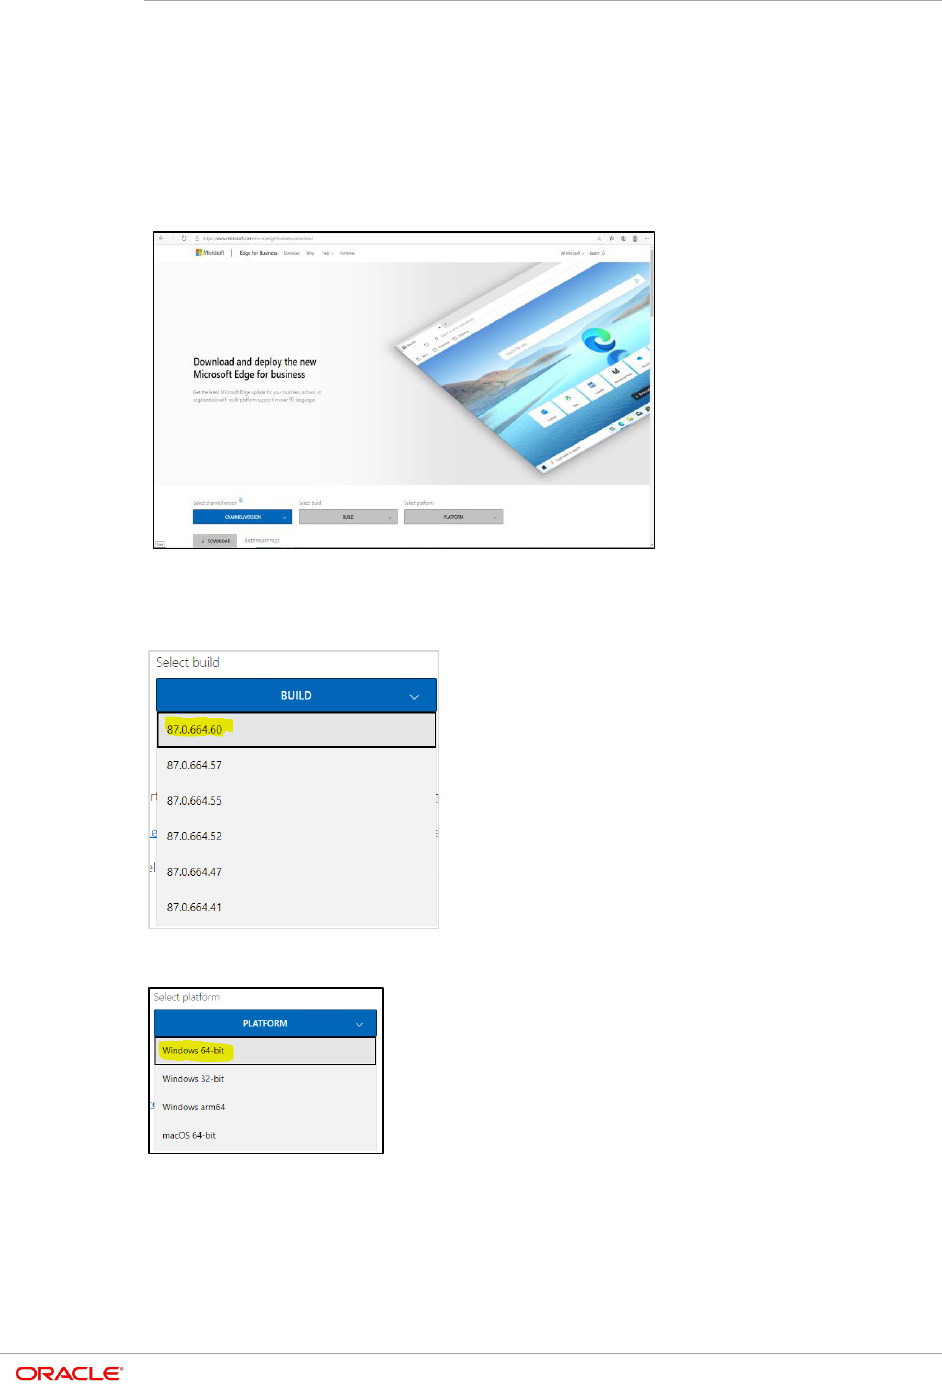
1. Click on the following URL to download Microsoft Edge Administrative Template
https://www.microsoft.com/en-us/edge/business/download
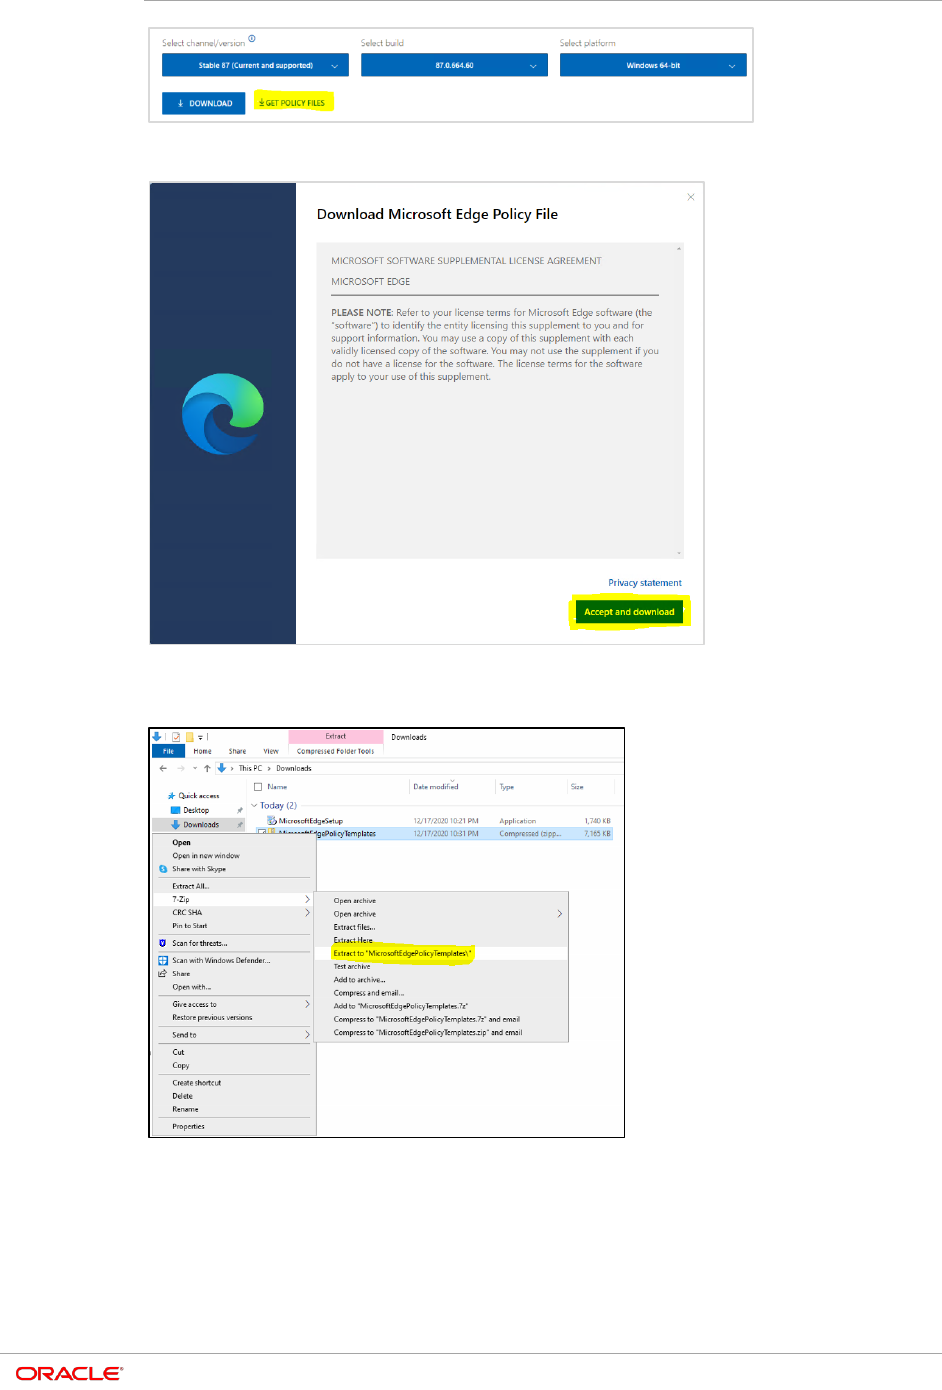
2. Select the below CHANNEL / VERSION: Current and Supported.
3. Build: Latest (current latest 87.0.664.60).
4. Platform: Windows 64-bit
5. Select GET POLICY FILES, Download Microsoft Edge Policy File popup window is
display.
Chapter 4
Setting Microsoft Edge with IE 11 Compatibility Manually
4-6
6. Click Accept and Download.
7. Navigate to the download location and extract the Zip file
(MicrosoftEdgePolicyTemplates.zip).
8. Once the file is extracted to local drive, Go to Windows and launch Edit Group
Policy.

Chapter 4
Setting Microsoft Edge with IE 11 Compatibility Manually
4-7
9. On Local Group Policy Editor Window, Navigate to Local Computer Policy, Computer
Configuration. Select Administrative Templates, right click and then select Add /
Remove Templates.
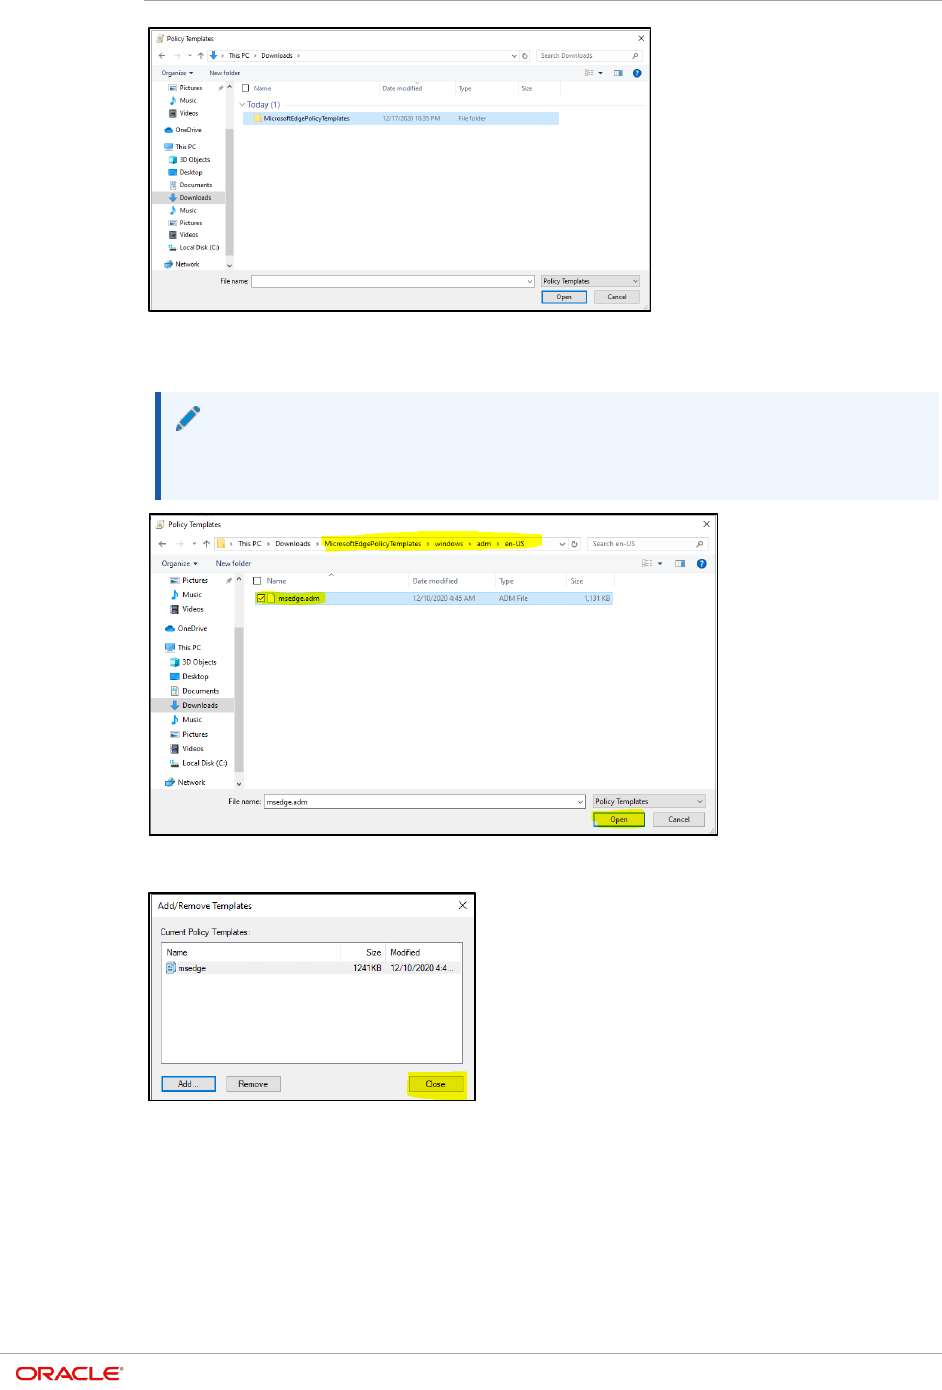
10. On the Add/Remove Templates popup window. Click Add.
11. On the Policy Templates file selection popup window browse to the location where
MicrosoftEdgePolicyTemplates zip file has been extracted.
Chapter 4
Setting Microsoft Edge with IE 11 Compatibility Manually
4-8
12. Under MicrosoftEdgePolicyTemplates folder browse to windows, adm, en-US, and
then select the file “msedge.adm” file and click Open.
NOTE:
Select the appropriate folder under “adm” based on the language you want to
setup.
13. Let the file get loaded and click Close.
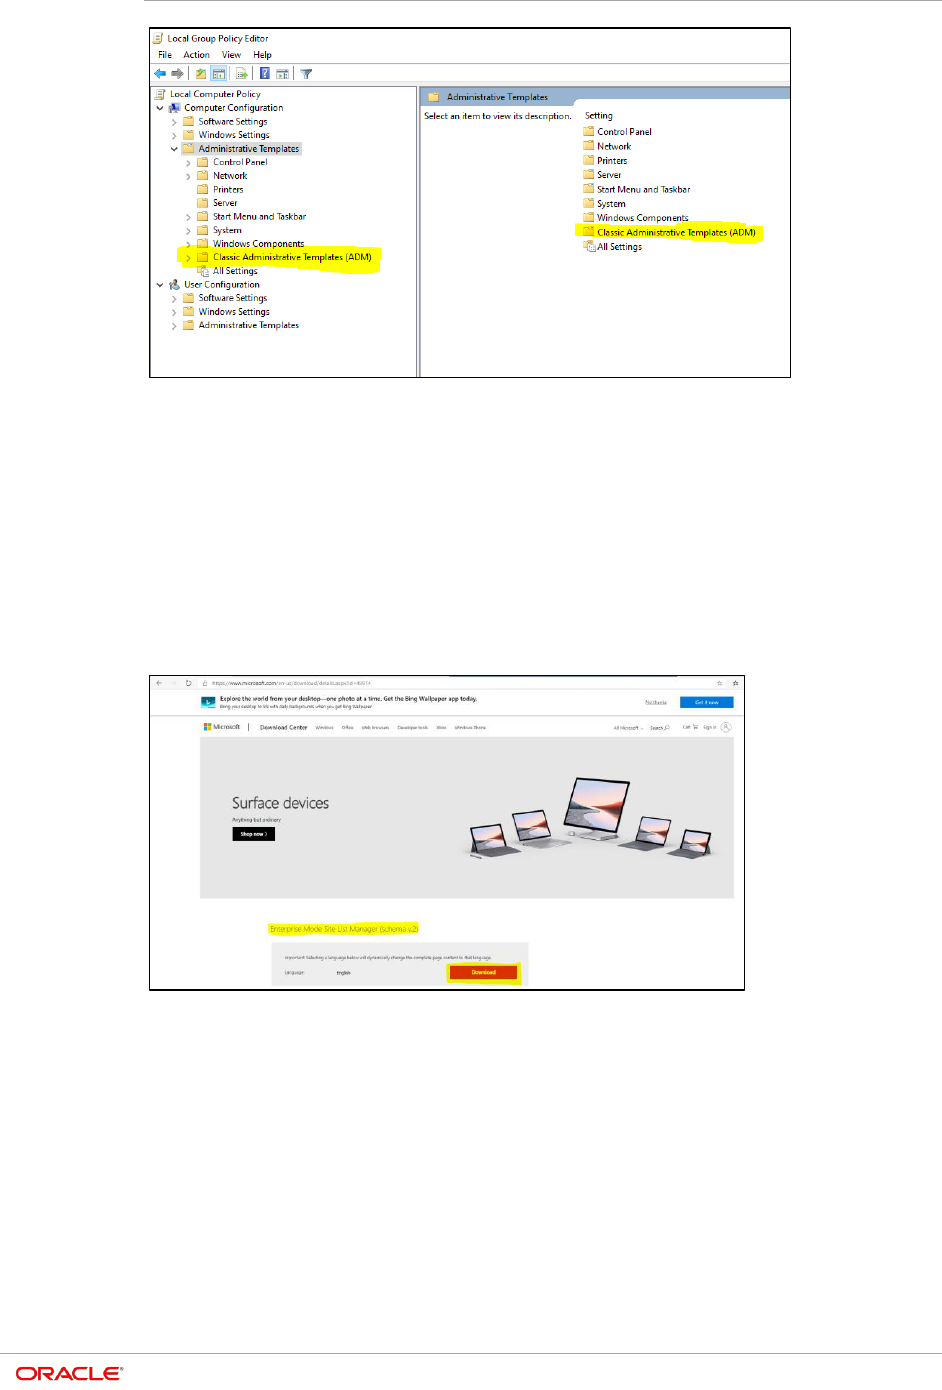
14. Expand Administrative Templates and verify that Classic Administrative Templates
(ADM) is present.
Chapter 4
Setting Microsoft Edge with IE 11 Compatibility Manually
4-9
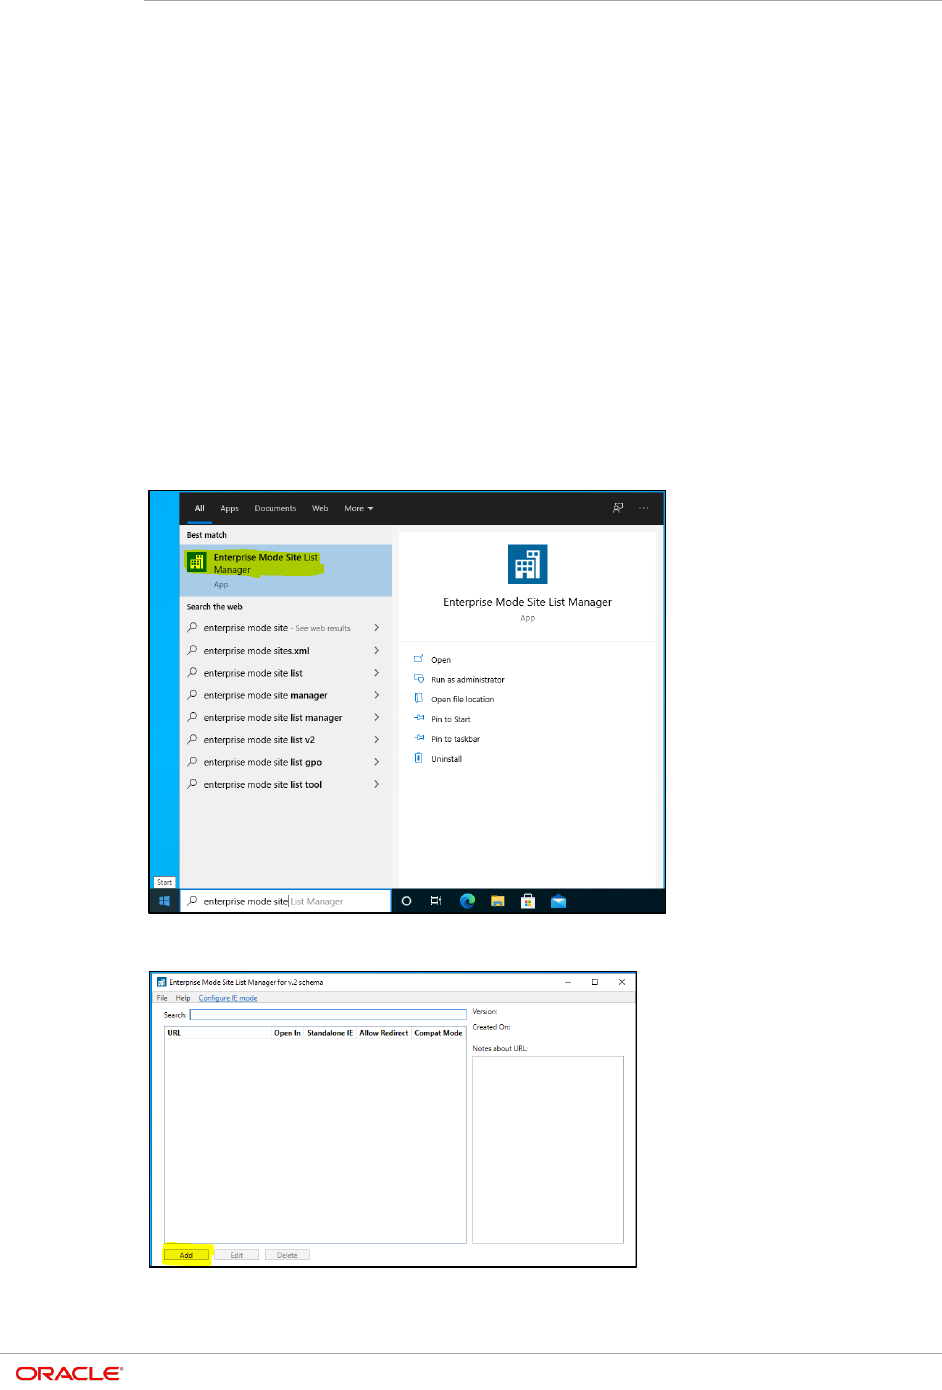
Enterprise Mode Site List Manager
Download and Install Enterprise Mode Site List Manager.
1. Click the following URL to download Enterprise Mode Site List Manager.
https://www.microsoft.com/en-us/download/details.aspx?id=49974
Download the Enterprise Mode Site List Manager (schema v.2)
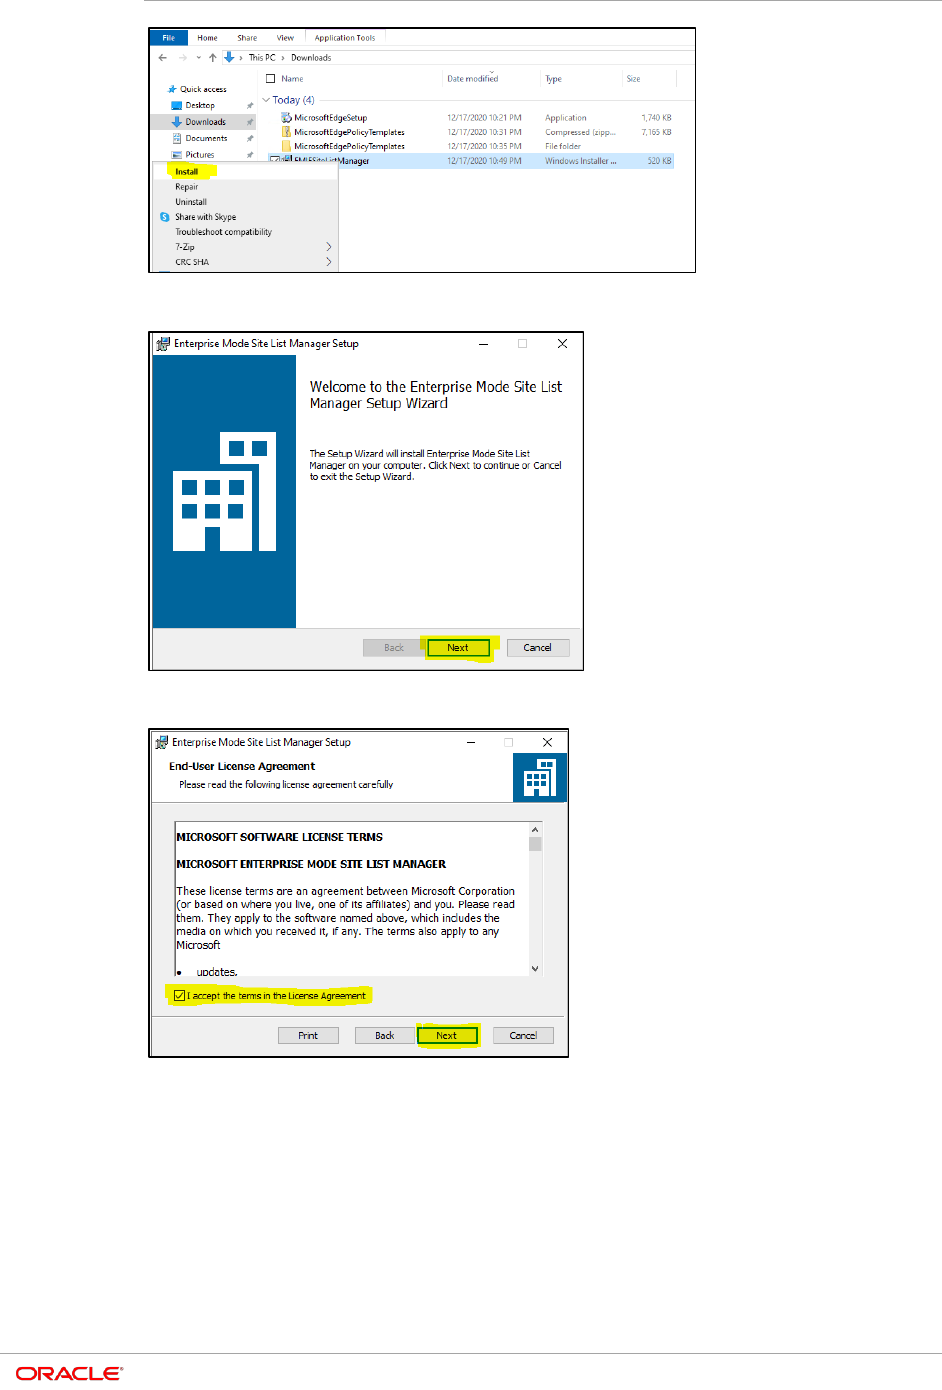
2. Navigate to the location where the .msi file has been downloaded. Install the
EMIESiteListManager.msi, Enterprise Mode Site List Manger Setup window is
displayed.
Chapter 4
Setting Microsoft Edge with IE 11 Compatibility Manually
4-10
3. Click Next.
4. Select the checkbox for End-User License Agreement and click Next.
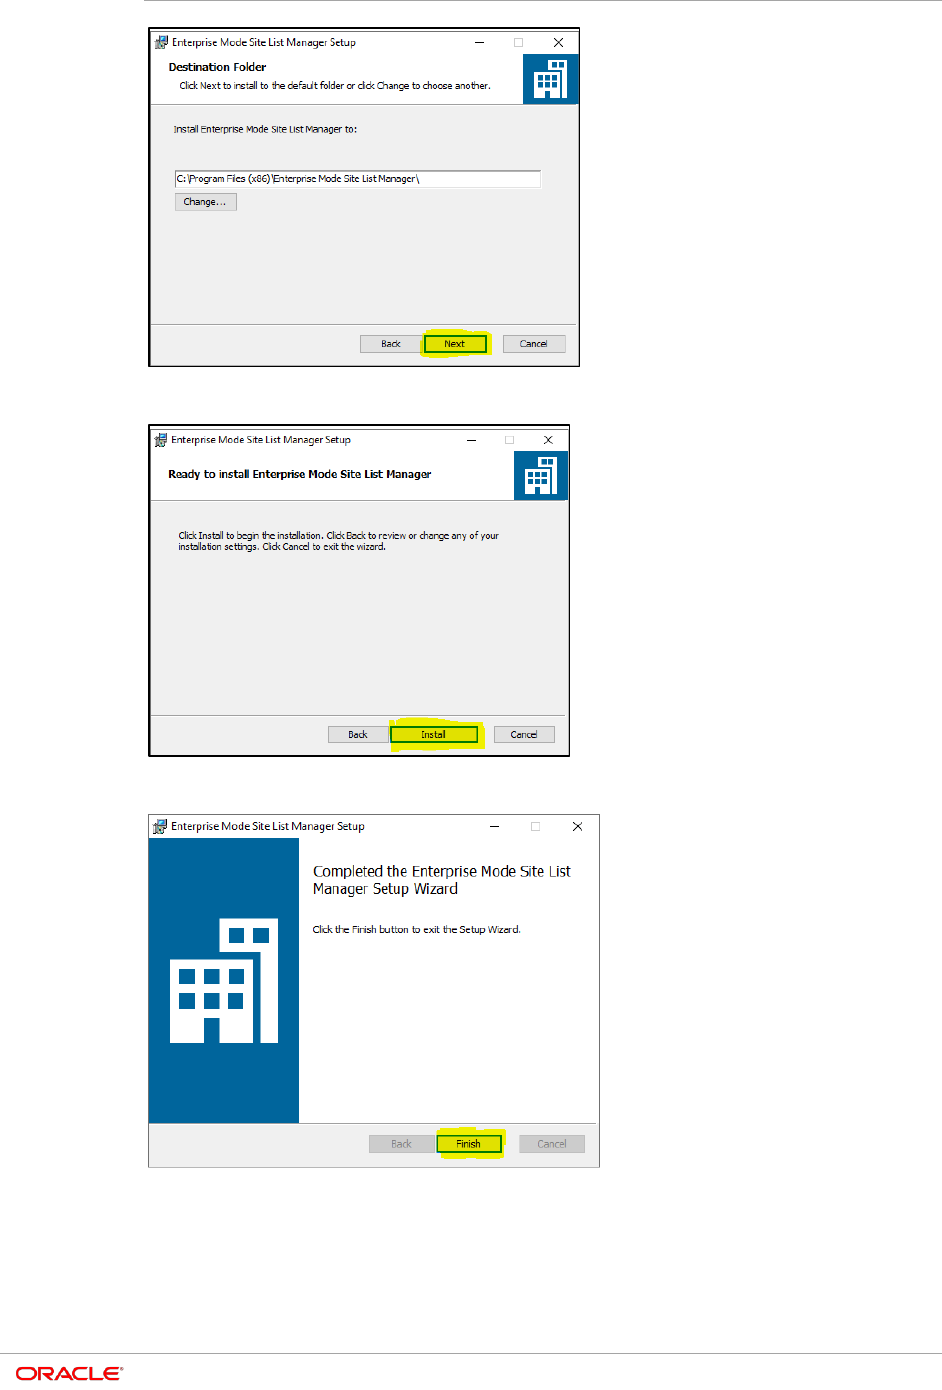
5. On the Destination Folder do not make any change and click Next.
Chapter 4
Setting Microsoft Edge with IE 11 Compatibility Manually
4-11
6. On the Ready to Install Enterprise Mode Site List Manager window, click Install.
7. Click Finish.
Chapter 4
Setting Microsoft Edge with IE 11 Compatibility Manually
4-12
Configurations
This section will explain on how to add OPERA 5 Sites in Enterprise Mode Site List
Manager and then configure the following settings in local Group Policy Editor.
• Configure the Enterprise Mode Site List
• Use the Enterprise Mode IE website list
• Configure the Enterprise Mode Site List
• Allow Microsoft Compatibility List
• Send all Intranet sites to Internet Explorer 11
Once the sites are added and the above mentioned settings are configured, the sites can
then be launched from Microsoft Edge Chromium browser.
1. Navigate to Windows, Enterprise Mode Site List Manger.
2. On the Enterprise Mode Site List Manger for v.2 schema popup window, click Add.
3. Add new website window is displayed.

Chapter 4
Setting Microsoft Edge with IE 11 Compatibility Manually
4-13
4. Provide below details for the site to be used in Compatibility mode.
URL
NOTE:
Make sure that no protocol is specified when adding the URL.
Using a URL like contoso.com, will automatically applies both http://contoso.com and
https://contoso.com.
Open In :- IE11
Standalone IE :- Unchecked
Allow Redirect :- Checked
Compat Mode :- Default Mode
Notes about URL :- Provide some description for the URL (This step is optional)
Click Save.
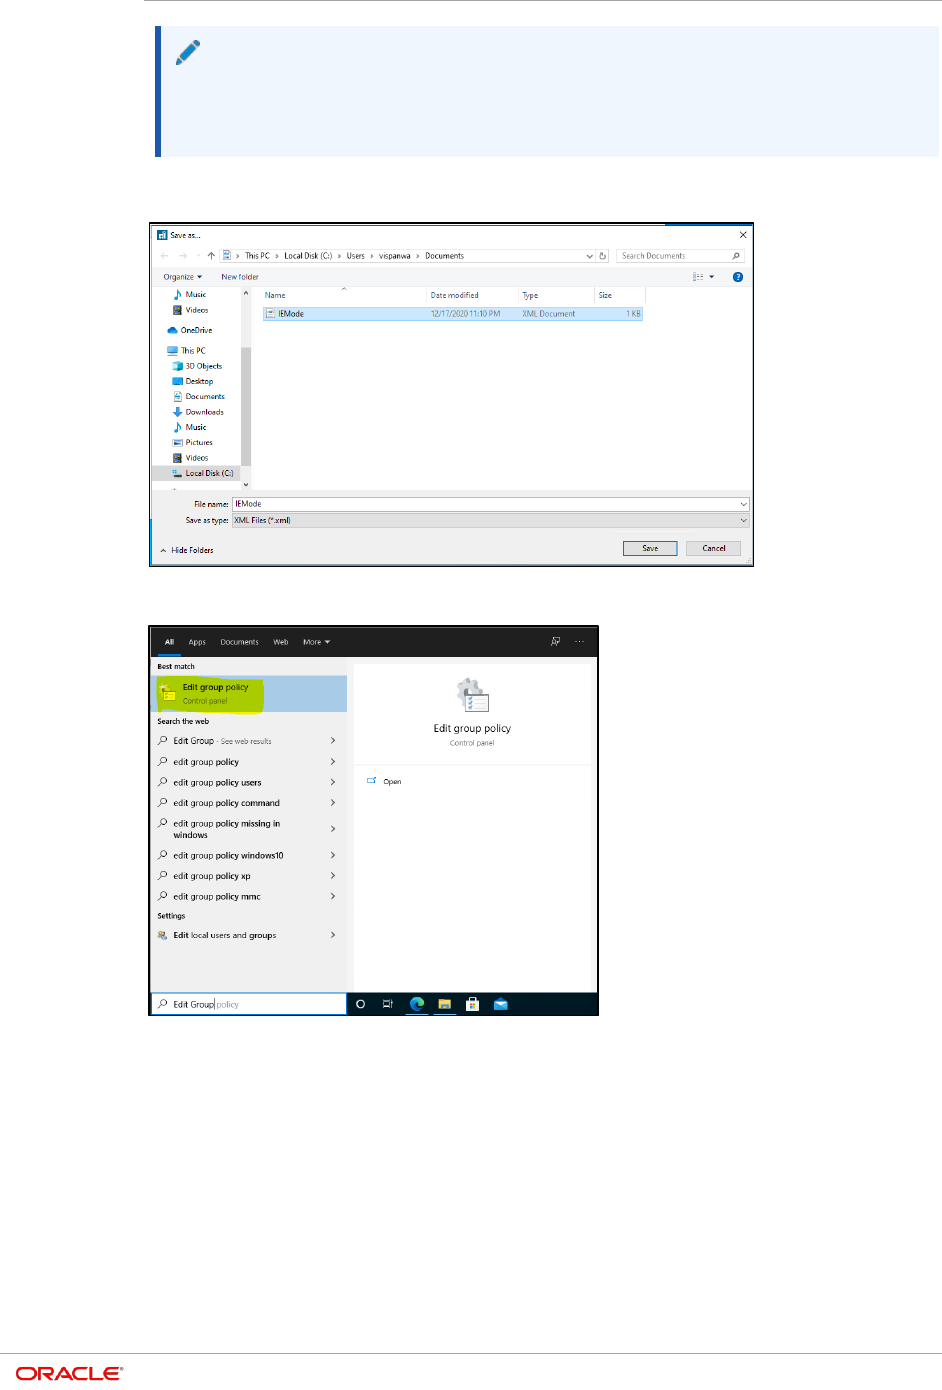
5. On the Enterprise Mode Site List Manger for v.2 schema popup window, navigate to
File > Save to XML.
6. Navigate to a location where you want to save the Site List XML, and save the file.
Chapter 4
Setting Microsoft Edge with IE 11 Compatibility Manually
4-14
NOTE:
This XML file is used in configure the settings in “Use the Enterprise Mode IE
website list”. So, it is recommended you override the same existing saved XML
file whenever you add new sites.
For example, if you save the file as “IEMode.xml”, next time when you add a new
site, ensure that you choose the same file.
7. Now Edit the Group Policies, go to Windows, Edit Group Policy.
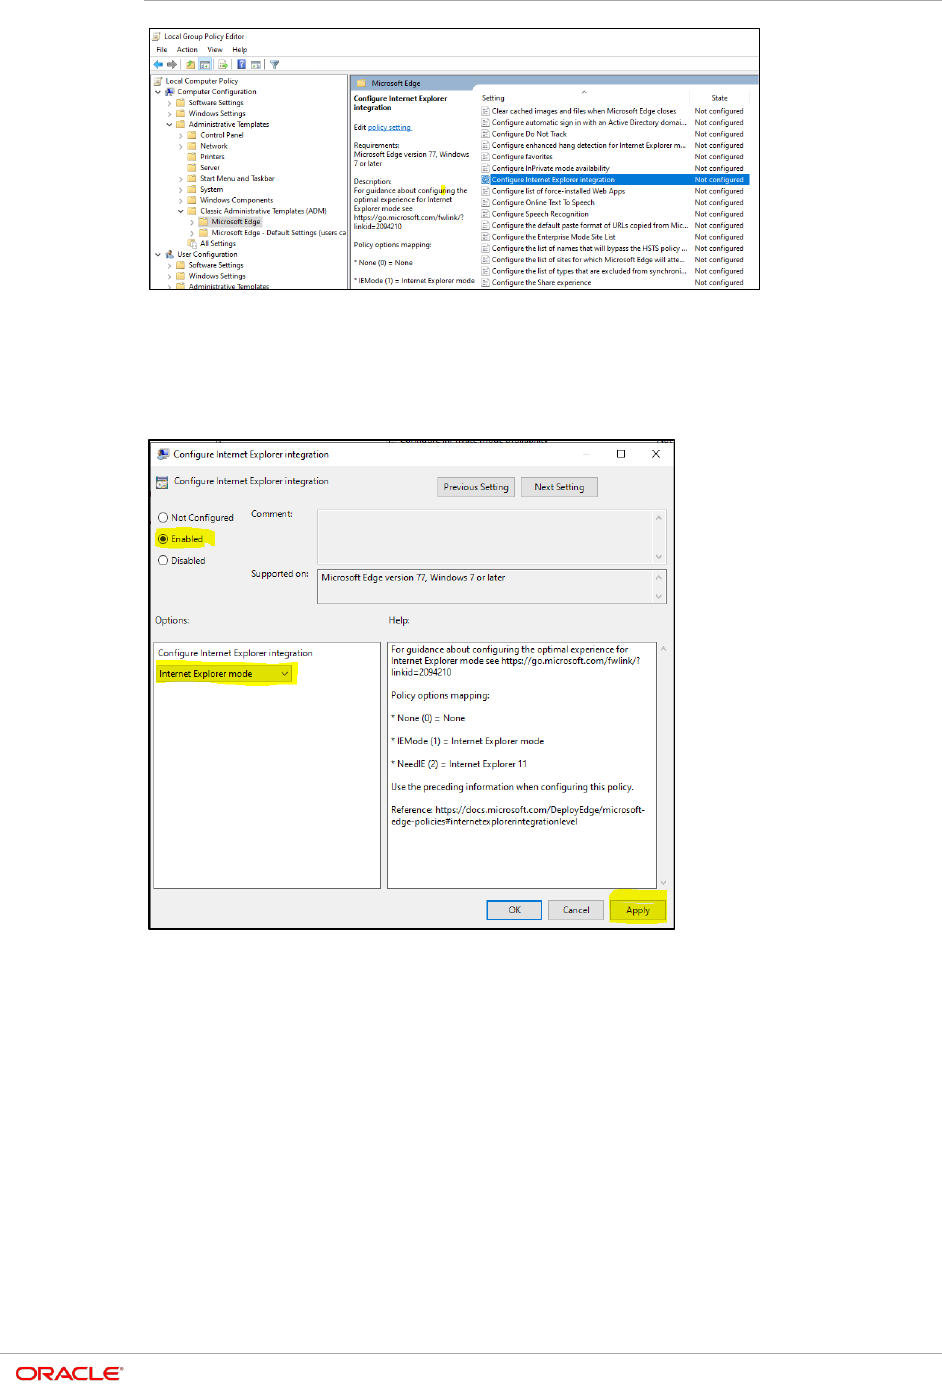
8. On Local Group Policy Editor window, navigate to Local Computer Policy,
Computer Configuration, Administrative Templates, Classic Administrative
Templates (ADM), Microsoft Edge.
Double click Configure Internet Explorer integration.
Chapter 4
Setting Microsoft Edge with IE 11 Compatibility Manually
4-15
On the popup window set the below, And click on the Apply button and then click
OK.
Check the Enabled radio button.
Under Configure Internet Explorer integration drop down select Internet Explorer
mode
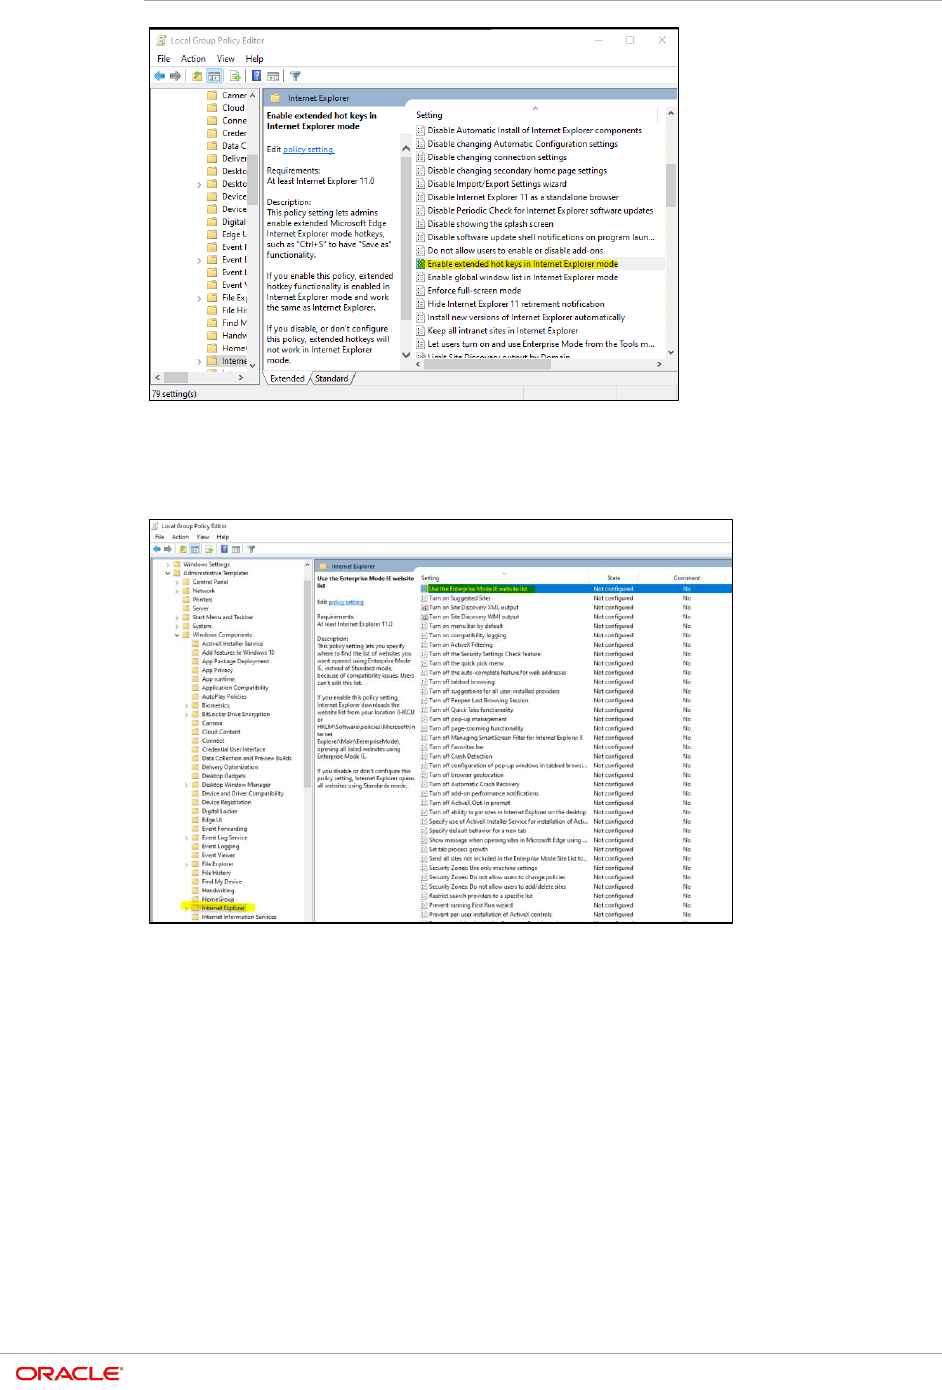
9. On Local Group Policy Editor window, navigate to Local Computer Policy,
Computer Configuration, Administrative Templates, Windows Components,
Internet Explorer.
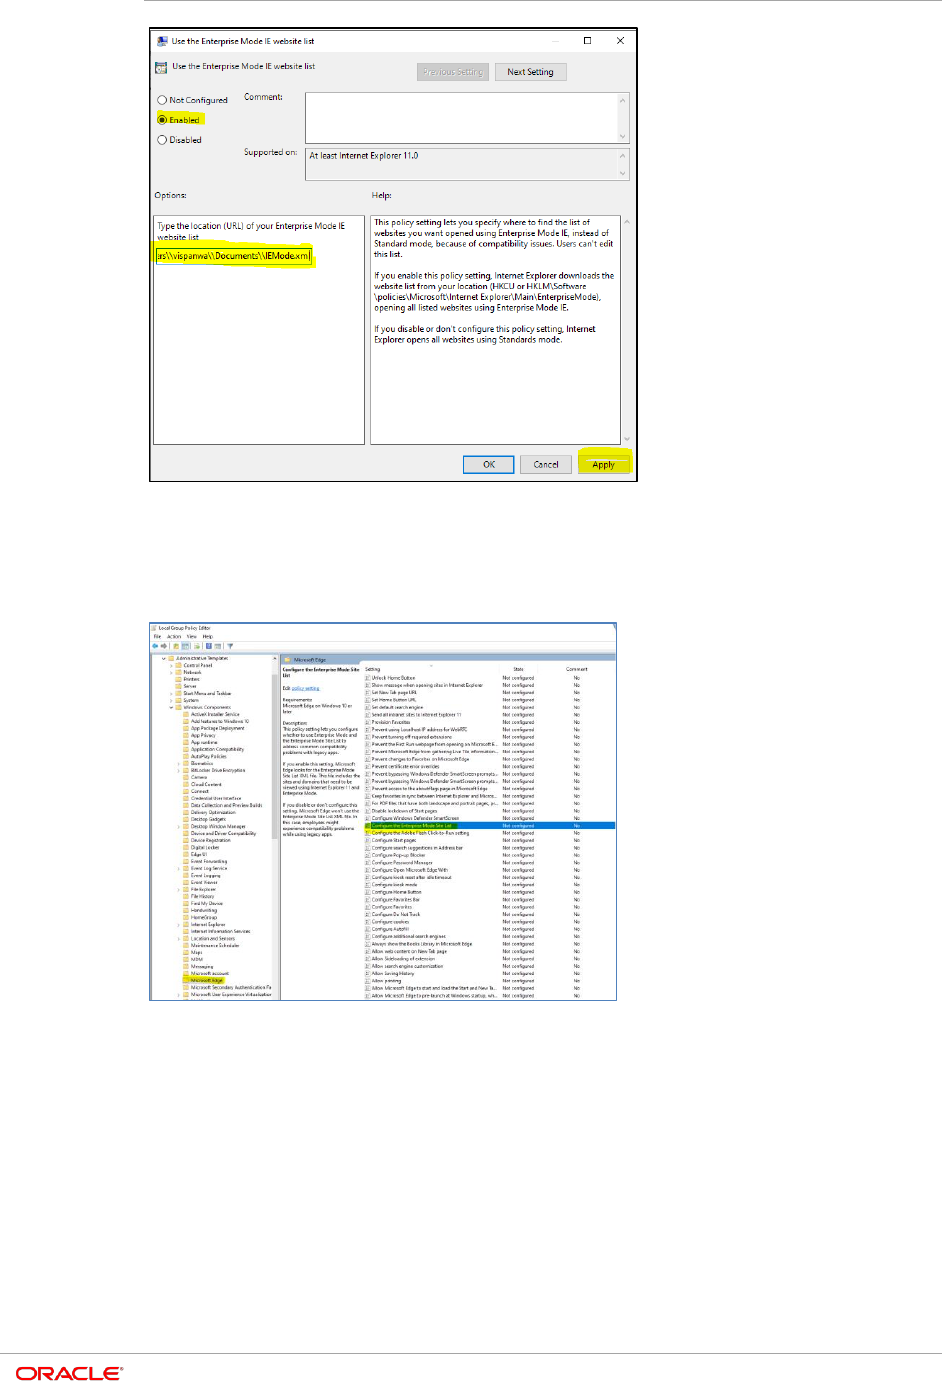
Double click Use the Enterprise Mode IE website list.
Chapter 4
Setting Microsoft Edge with IE 11 Compatibility Manually
4-16
• "OPTIONAL: Enable extended hot keys in Internet Explorer mode. By enabling this
optional step, hot keys can be used. When a report is generated in a browser window
using a format such as XML, pressing Ctrl + S causes the SAVE AS button to
appear."
On the popup window set the below, and click Apply and then OK.
– Select the Enabled option.
– Under Options provide the location of the Site List XML saved at above step
3.a.vii as per below format
file:///C:\\Users\\<user>\\Documents\\<XML file name>.xml
Chapter 4
Setting Microsoft Edge with IE 11 Compatibility Manually
4-17
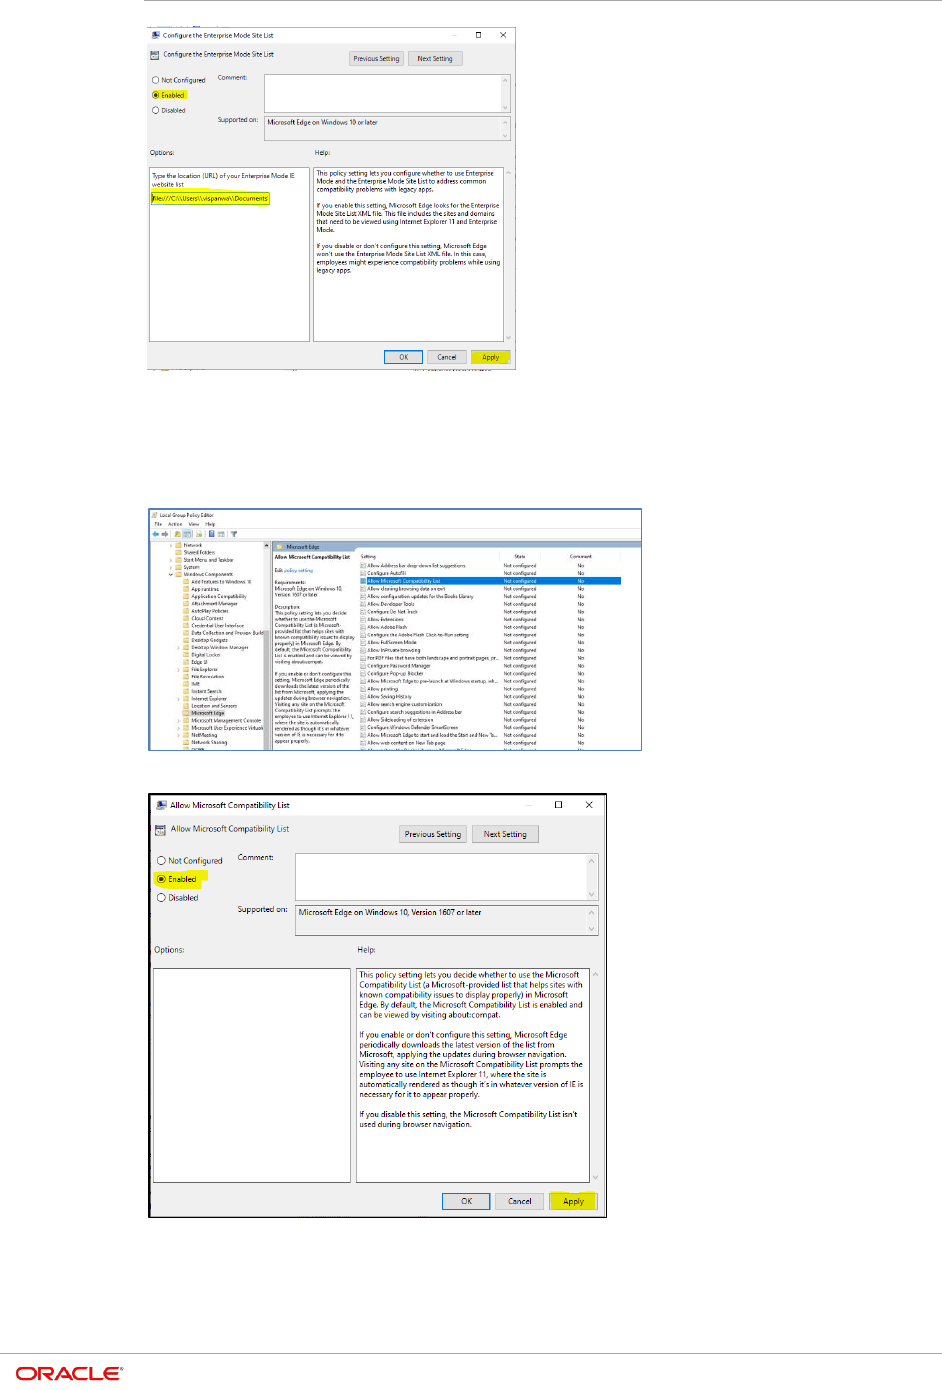
10. On Local Group Policy Editor window, navigate to Local Computer Policy,
Computer Configuration, Administrative Templates, Windows Components,
Microsoft Edge.
Double click Configure the Enterprise Mode Site List.
Chapter 4
Setting Microsoft Edge with IE 11 Compatibility Manually
4-18
11. On Local Group Policy Editor window, navigate to Local Computer Policy,
Computer Configuration, Administrative Templates, Windows Components,
Microsoft Edge.
Double click Allow Microsoft Compatibility List.
• On the popup window, Select the Enabled option, and click Apply.
12. On Local Group Policy Editor window, navigate to Local Computer Policy,
Computer Configuration, Administrative Templates, Windows Components,
Microsoft Edge.
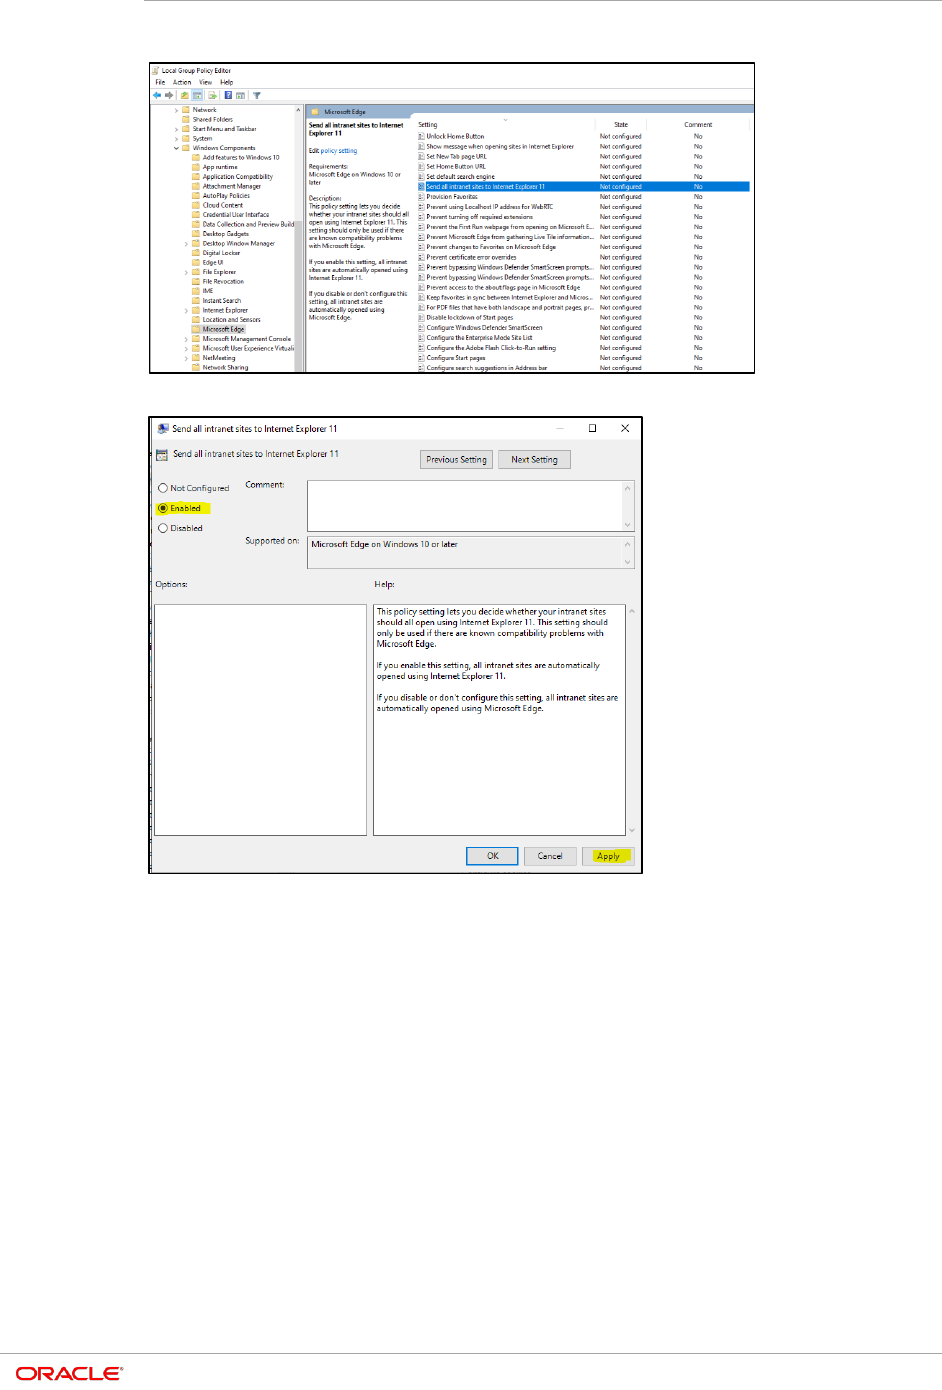
Chapter 4
Setting Microsoft Edge with IE 11 Compatibility Manually
4-19
Double click Send all Intranet sites to Internet Explorer 11.
• On the popup window, select the Enabled option, click Apply and then click OK.
Chapter 4
Setting Microsoft Edge with IE 11 Compatibility Manually
4-20
Popup Blocker setting for Reports Preview
NOTE:
For PDF documents, if Acrobat Reader is not installed you have the option to
Save the document or Open the document in your browser.
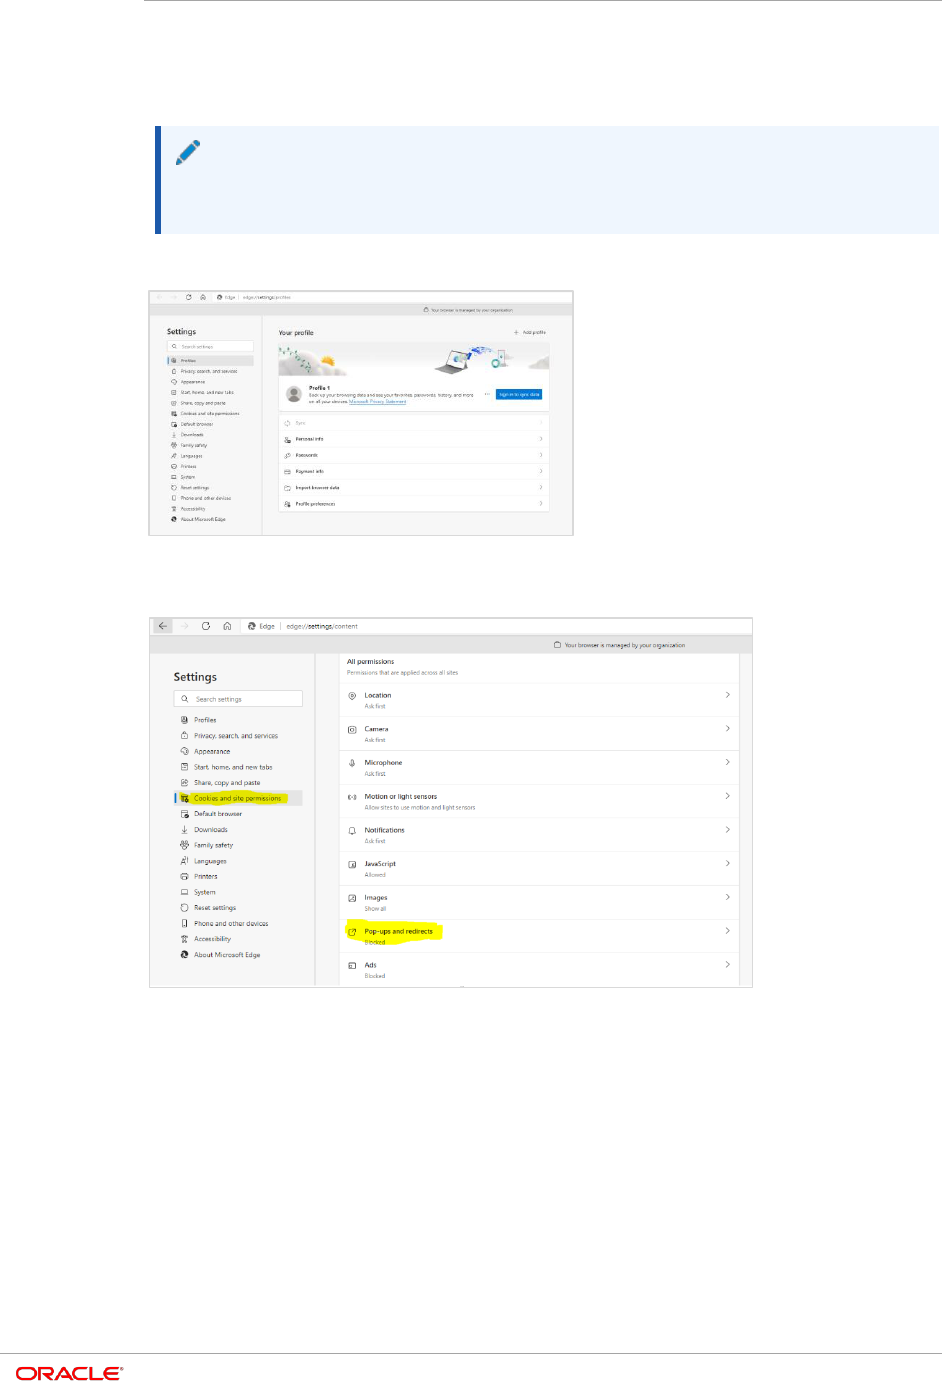
1. Navigate to Settings on the Edge Browser.
2. On the Settings page navigate to Cookies and site permissions, Pop-ups and
redirects.
3. Click Add in the Allow section.
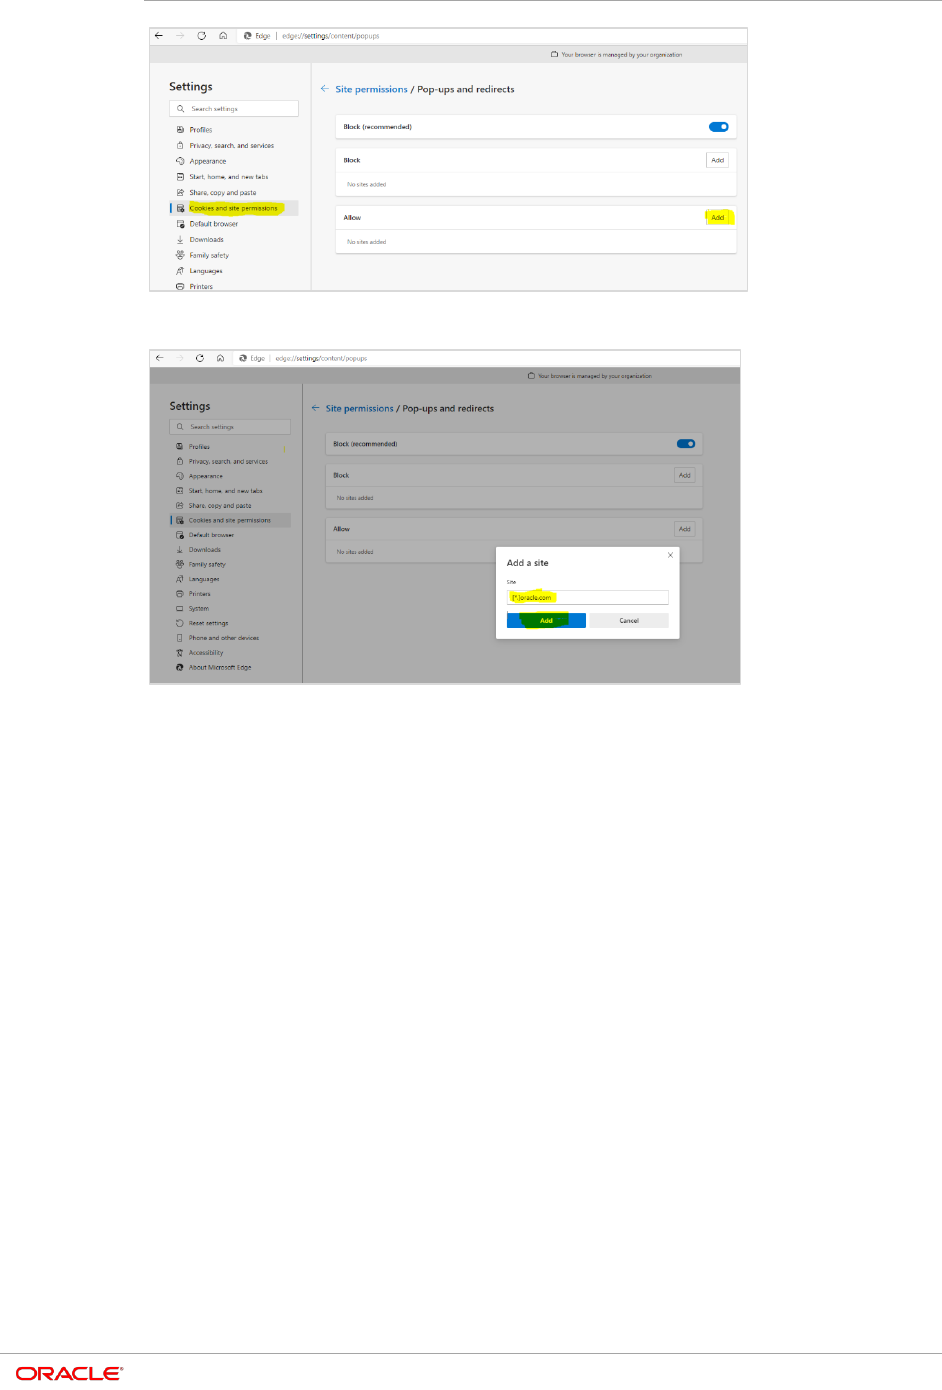
Chapter 4
Setting Microsoft Edge with IE 11 Compatibility Manually
4-21
4. Add [*.]oracle.com as the site and click Add.
5-1
5
Setting Adobe Acrobat Reader Preferences
Depending on your Adobe Acrobat Reader version, the steps below may differ.
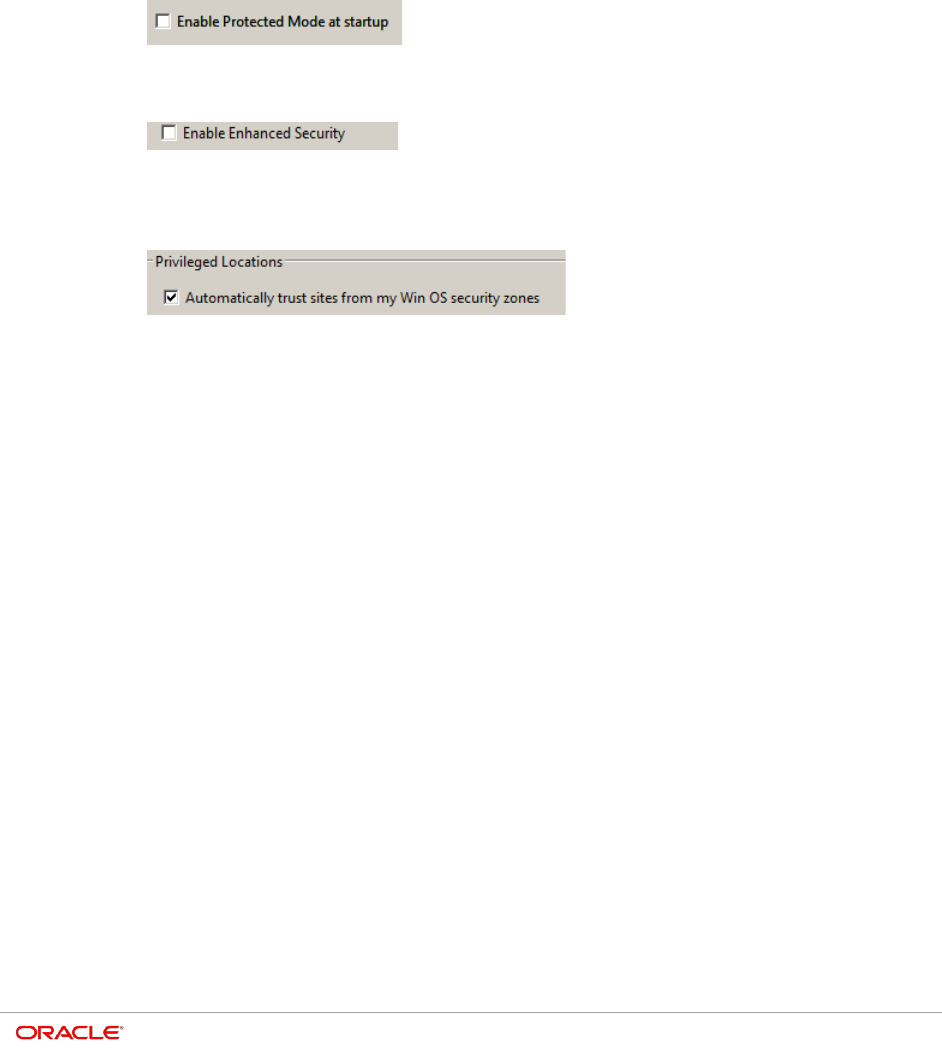
1. Open Adobe Acrobat Reader outside of the application.
2. Select Edit, select Preferences, select Security Enhanced, and deselect the
Enable Protected Mode at startup check box.
3. Select Edit, select Preferences, select Security (Enhanced), and then deselect the
Enable Enhanced Security check box.
4. Select Edit, select Preferences, select Security (Enhanced), and then select the
Automatically trust sites from my Win OS security zones check box and verify that the
OPERA URL is listed.

6-1
6
Installing Client Side Applications
Below listed is the only required client side application that needs to be installed for
5.6.5.x.
Installing Oracle Business Intelligence
Publisher
Trying to install Microsoft .NET Framework 3.5 gives the following errors (which are also
documented at https://docs.oracle.com/cd/E28280_01/index.html
• 0x800f0906: Windows couldn't connect to the Internet to download necessary files.
Make sure that you're connected to the Internet, and click Retry to try again.
• 0x800F081F: The changes could not be completed. Please reboot your computer
and try again.
Use the Microsoft Windows operating system installation media and the workaround:
DISM /Online /Enable-Feature /FeatureName:NetFx3 /All / LimitAccess
/Source:d:\sources\sxs
Now Microsoft .NET Framework 3.5 installs correctly and the BI Publisher installation can
continue. For additional information about installing BI Publisher, see
https://docs.oracle.com/cd/E28280_01/index.html
7-1
7
Un-Installing Client Side Applications
(Optional)
With 5.6.5.x OPERA does not require to have Opera JinitCheck Control, Opera Register
Terminal, and Oracle JInitiator XXXXX. Below steps should be carried out to clean-up
existing workstations. Not performing uninstallation will not have any adverse effect, so
this section will be optional. It should be noted that JInitiator XXXXX no longer exists with
5.6.x version, and should be uninstalled if installed from any previous version.
NOTE:
Recommendations before un-installing client side applications
Before un-installing client side applications, it is recommended to backup
TermReg.ini from below location
“%ALLUSERSPROFILE%\Oracle\Opera\TermReg.ini”.
After un-installation is completed, verify “TermReg.ini” still exists in
“%ALLUSERSPROFILE%\Oracle\Opera\TermReg.ini”.
Un-Installing OPERA JinitCheck Control
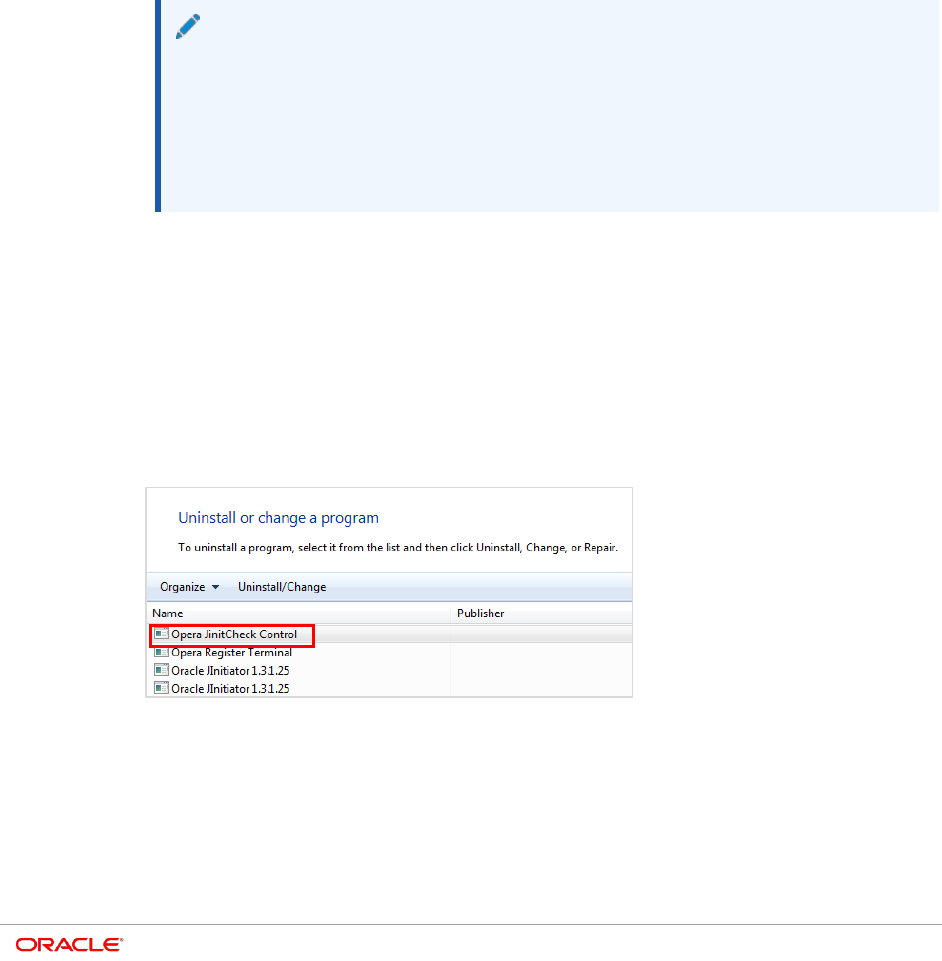
1. Open the Control Panel.
2. Click Uninstall a program under Programs.
3. Select Opera JinitCheck Control.
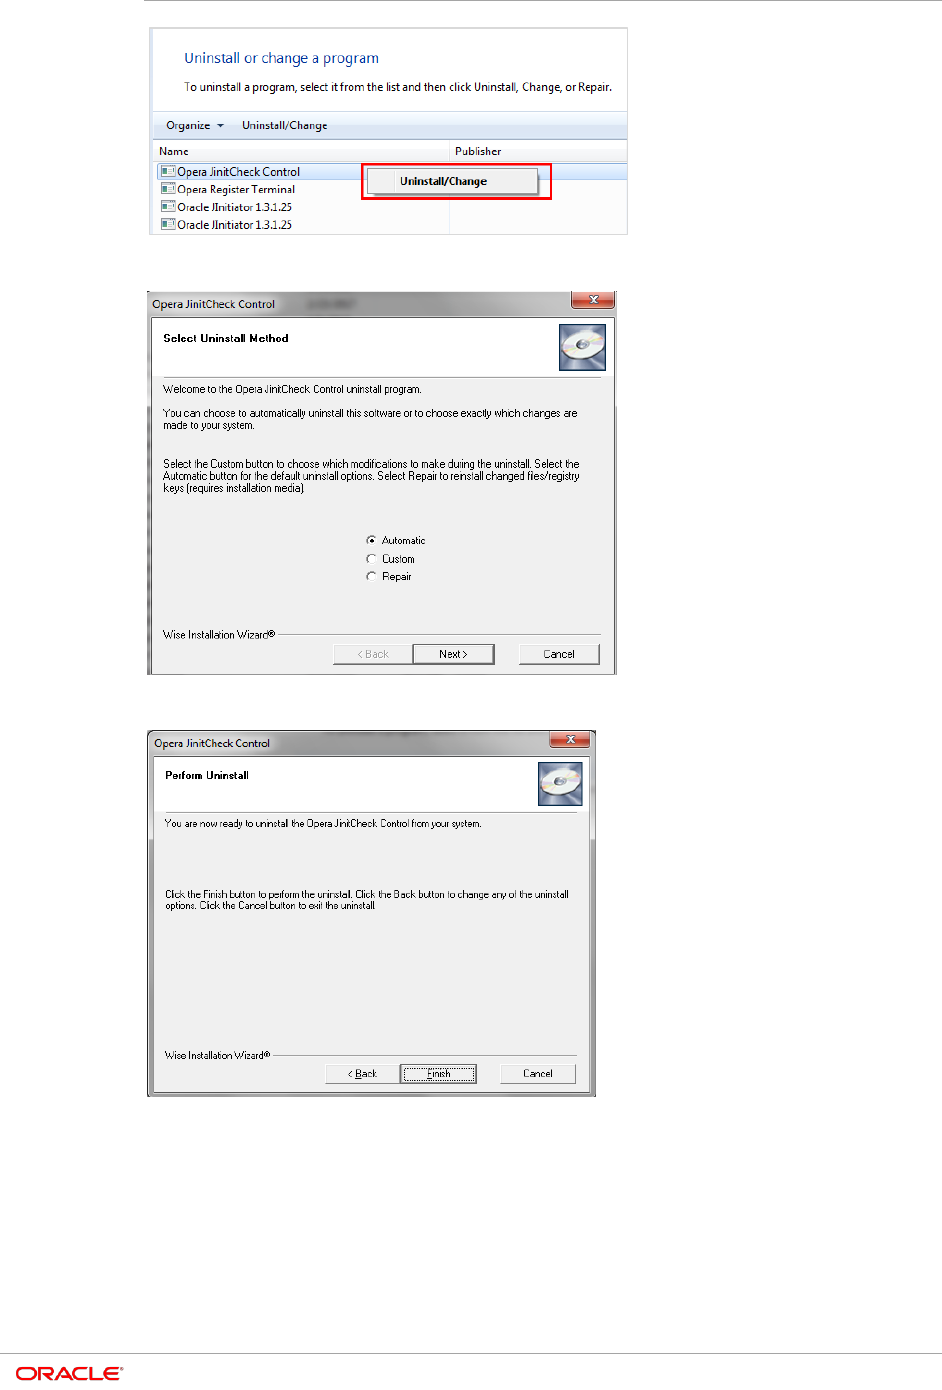
4. Right click and select Uninstall/Change.
Chapter 7
Un-Installing Client Side Applications (Optional)
7-2
5. Select Automatic and click Next.
6. Click Finish.
Chapter 7
Un-Installing Client Side Applications (Optional)
7-3
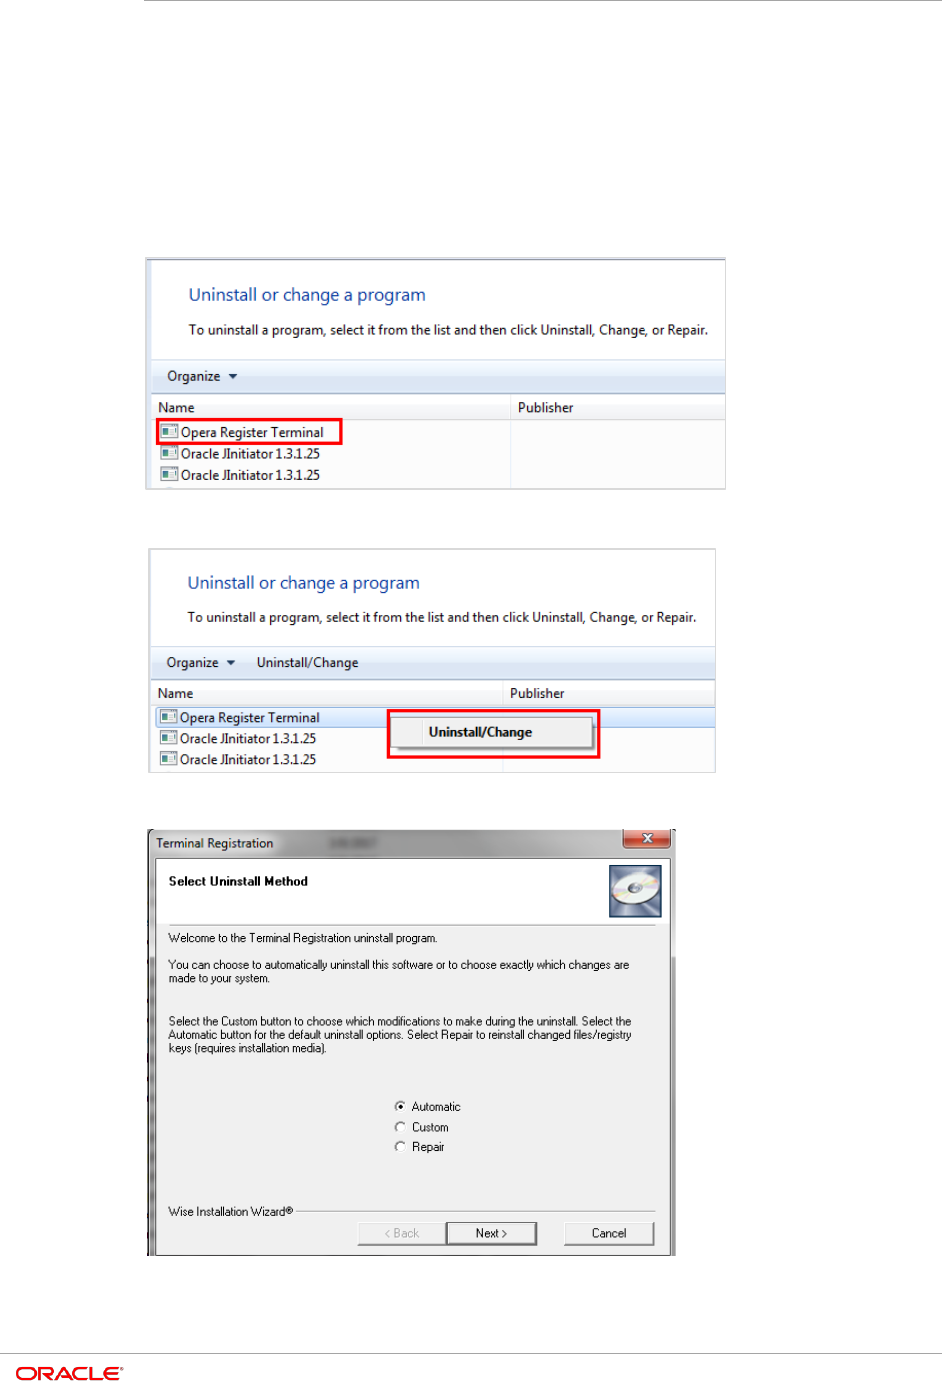
Un-Installing OPERA Register Terminal
1. Open the Control Panel.
2. Click Uninstall a program under Programs.
3. Select Opera Register Terminal.
4. Right click and select Uninstall/Change.
5. Select Automatic and click Next.
6. Click Finish.
Chapter 7
Un-Installing Client Side Applications (Optional)
7-4
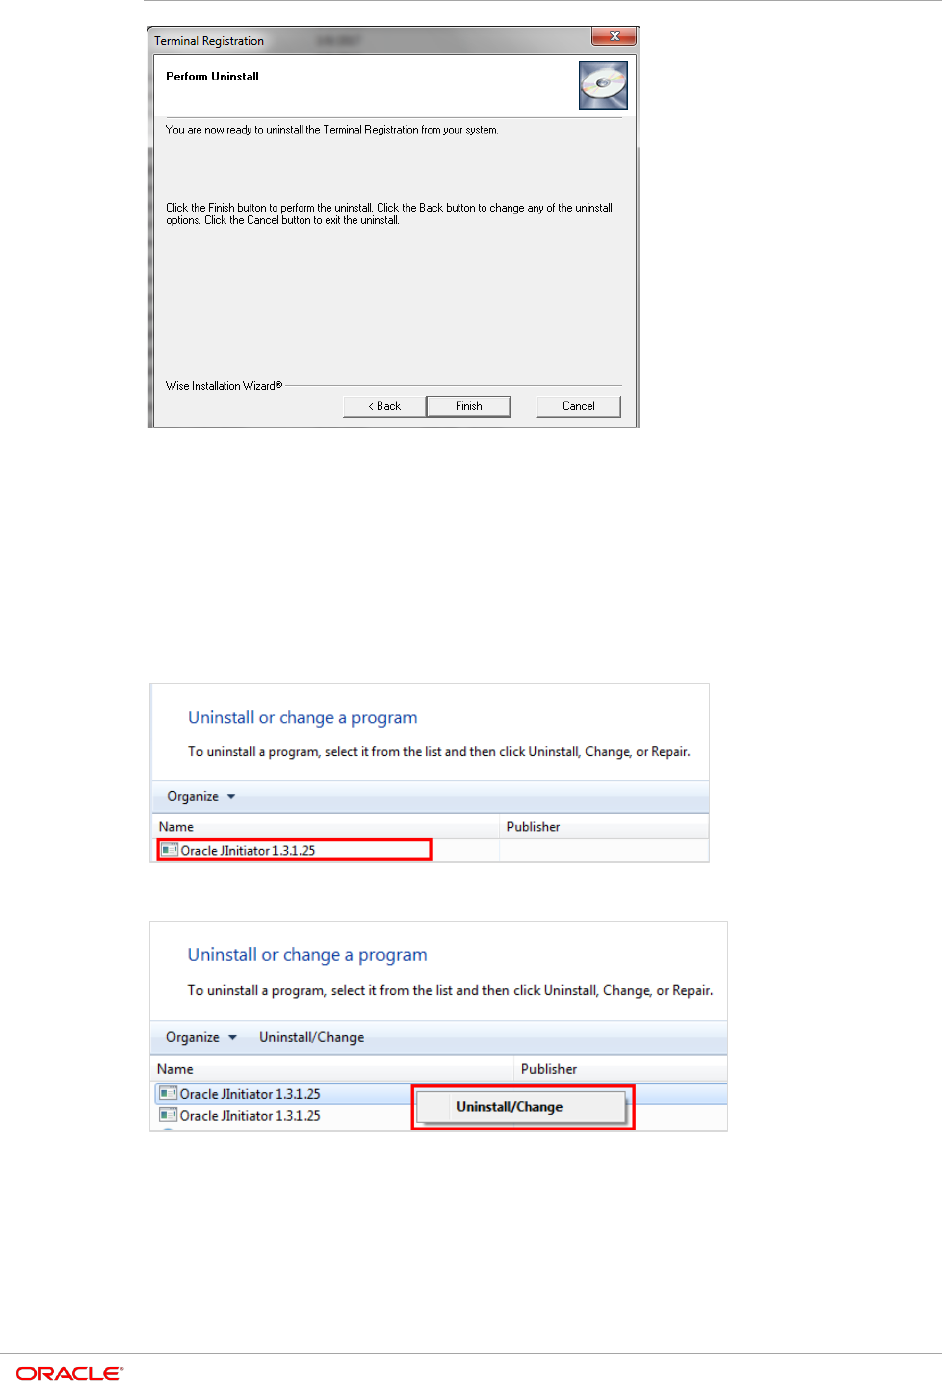
Un-Installing Oracle JInitiator XXXX
1. Open the Control Panel.
2. Click on Uninstall a program under Programs.
3. Select Oracle JInitiator XXXX.
4. Right click and select Uninstall/Change.
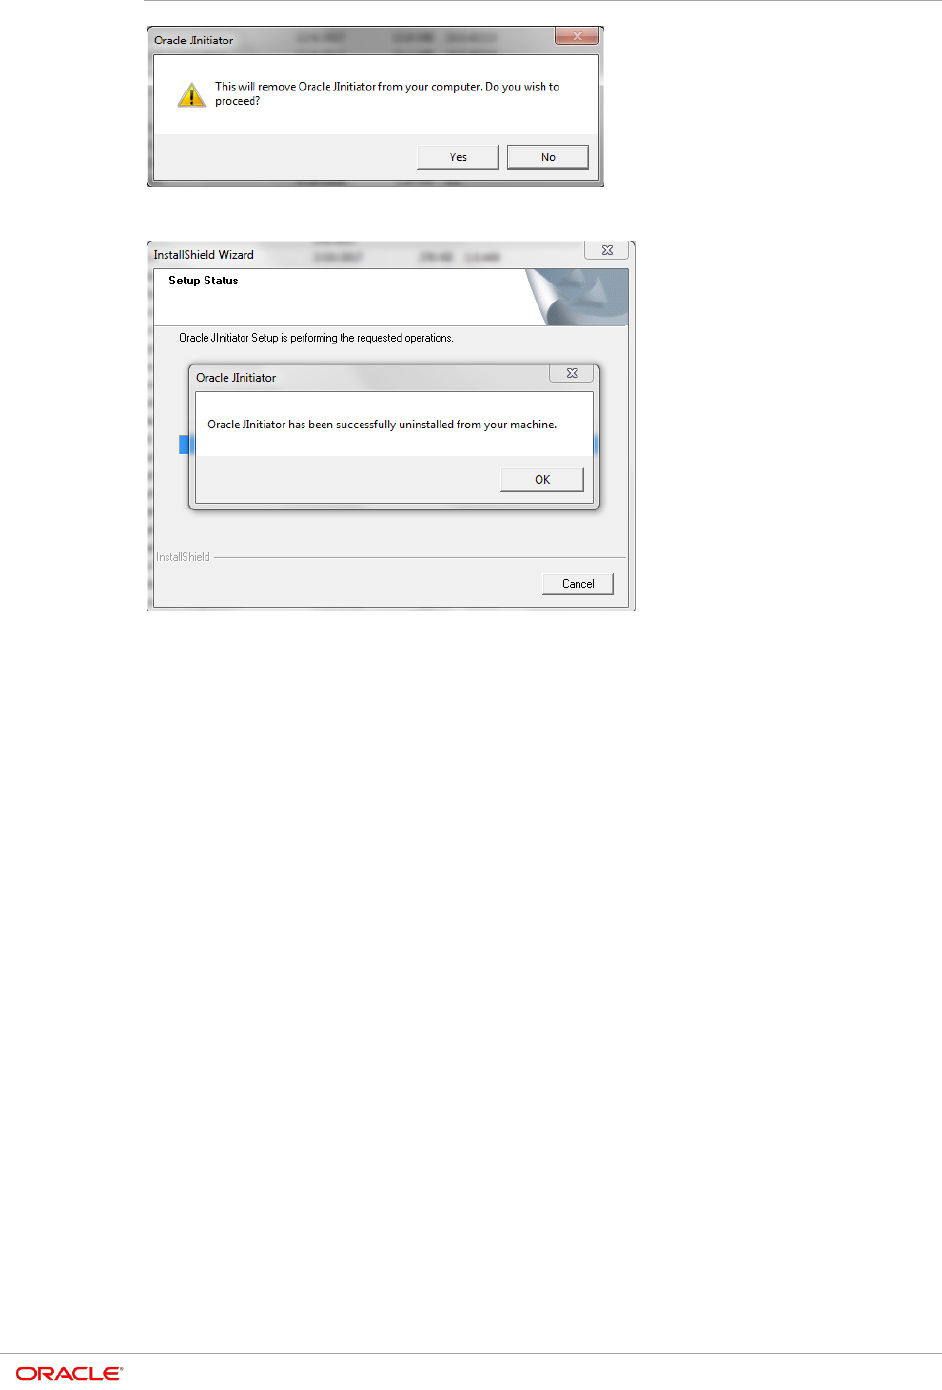
5. Click Yes to confirm.
Chapter 7
Un-Installing Client Side Applications (Optional)
7-5
6. Click OK.
